Yesterday morning, we officially finished updating our Keystone ski condo rental just in time for a professional photo shoot. Thanks to a super-speedy photographer (who, it turned out, had spent several years living in my hometown in Arkansas– small world!), the photos are here and ready to show off. As I mentioned in the “before” post, the overall aesthetic of the condo when we got it was “aggressively brown” with a side of “lodge cliche.” I think we’ve achieved a modern mountain aesthetic that feels both stylish and peaceful, and we’ve managed to add more sleeping accommodations. If you’d like to book a stay in our condo, please check out our VRBO listing.
Our building, Expedition Station, right in the heart of River Run Village.
I’m calling the wire animal heads my “vegan taxidermy.” All of the living room furniture is new. Log coffee table from Zulily (brand privilege), two log side tables from Target, pillows from Target, all other furniture from American Furniture Warehouse, and “vegan taxidermy” from Hobby Lobby.
My friend Lauren recently commented on Facebook, “Give the people what they want: a house tour!” So, Lauren, your wish is my command. I’m working on cleaning small segments of my house so I can take pictures of them and share them with my interwebz friends. This weekend I tackled the main living space on the first floor.
Our home is located in East Denver and is a 1911 bungalow. We didn’t do any of the renovations– the previous owners had a remodeler brother, and he did all the renovations for them in 2010. We didn’t even paint before moving in. Luckily they did an amazing job creating a space that seemed perfect for us from the moment we walked in, and that we love even more now that we’ve been living here since the end of June.
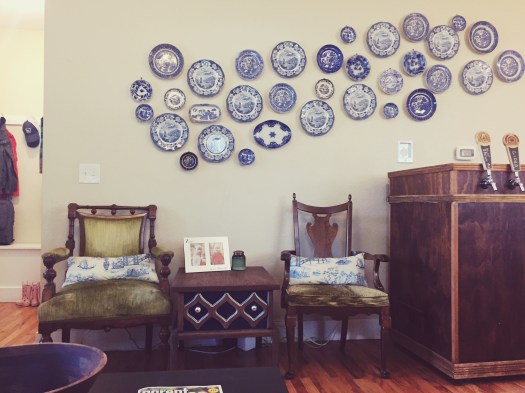
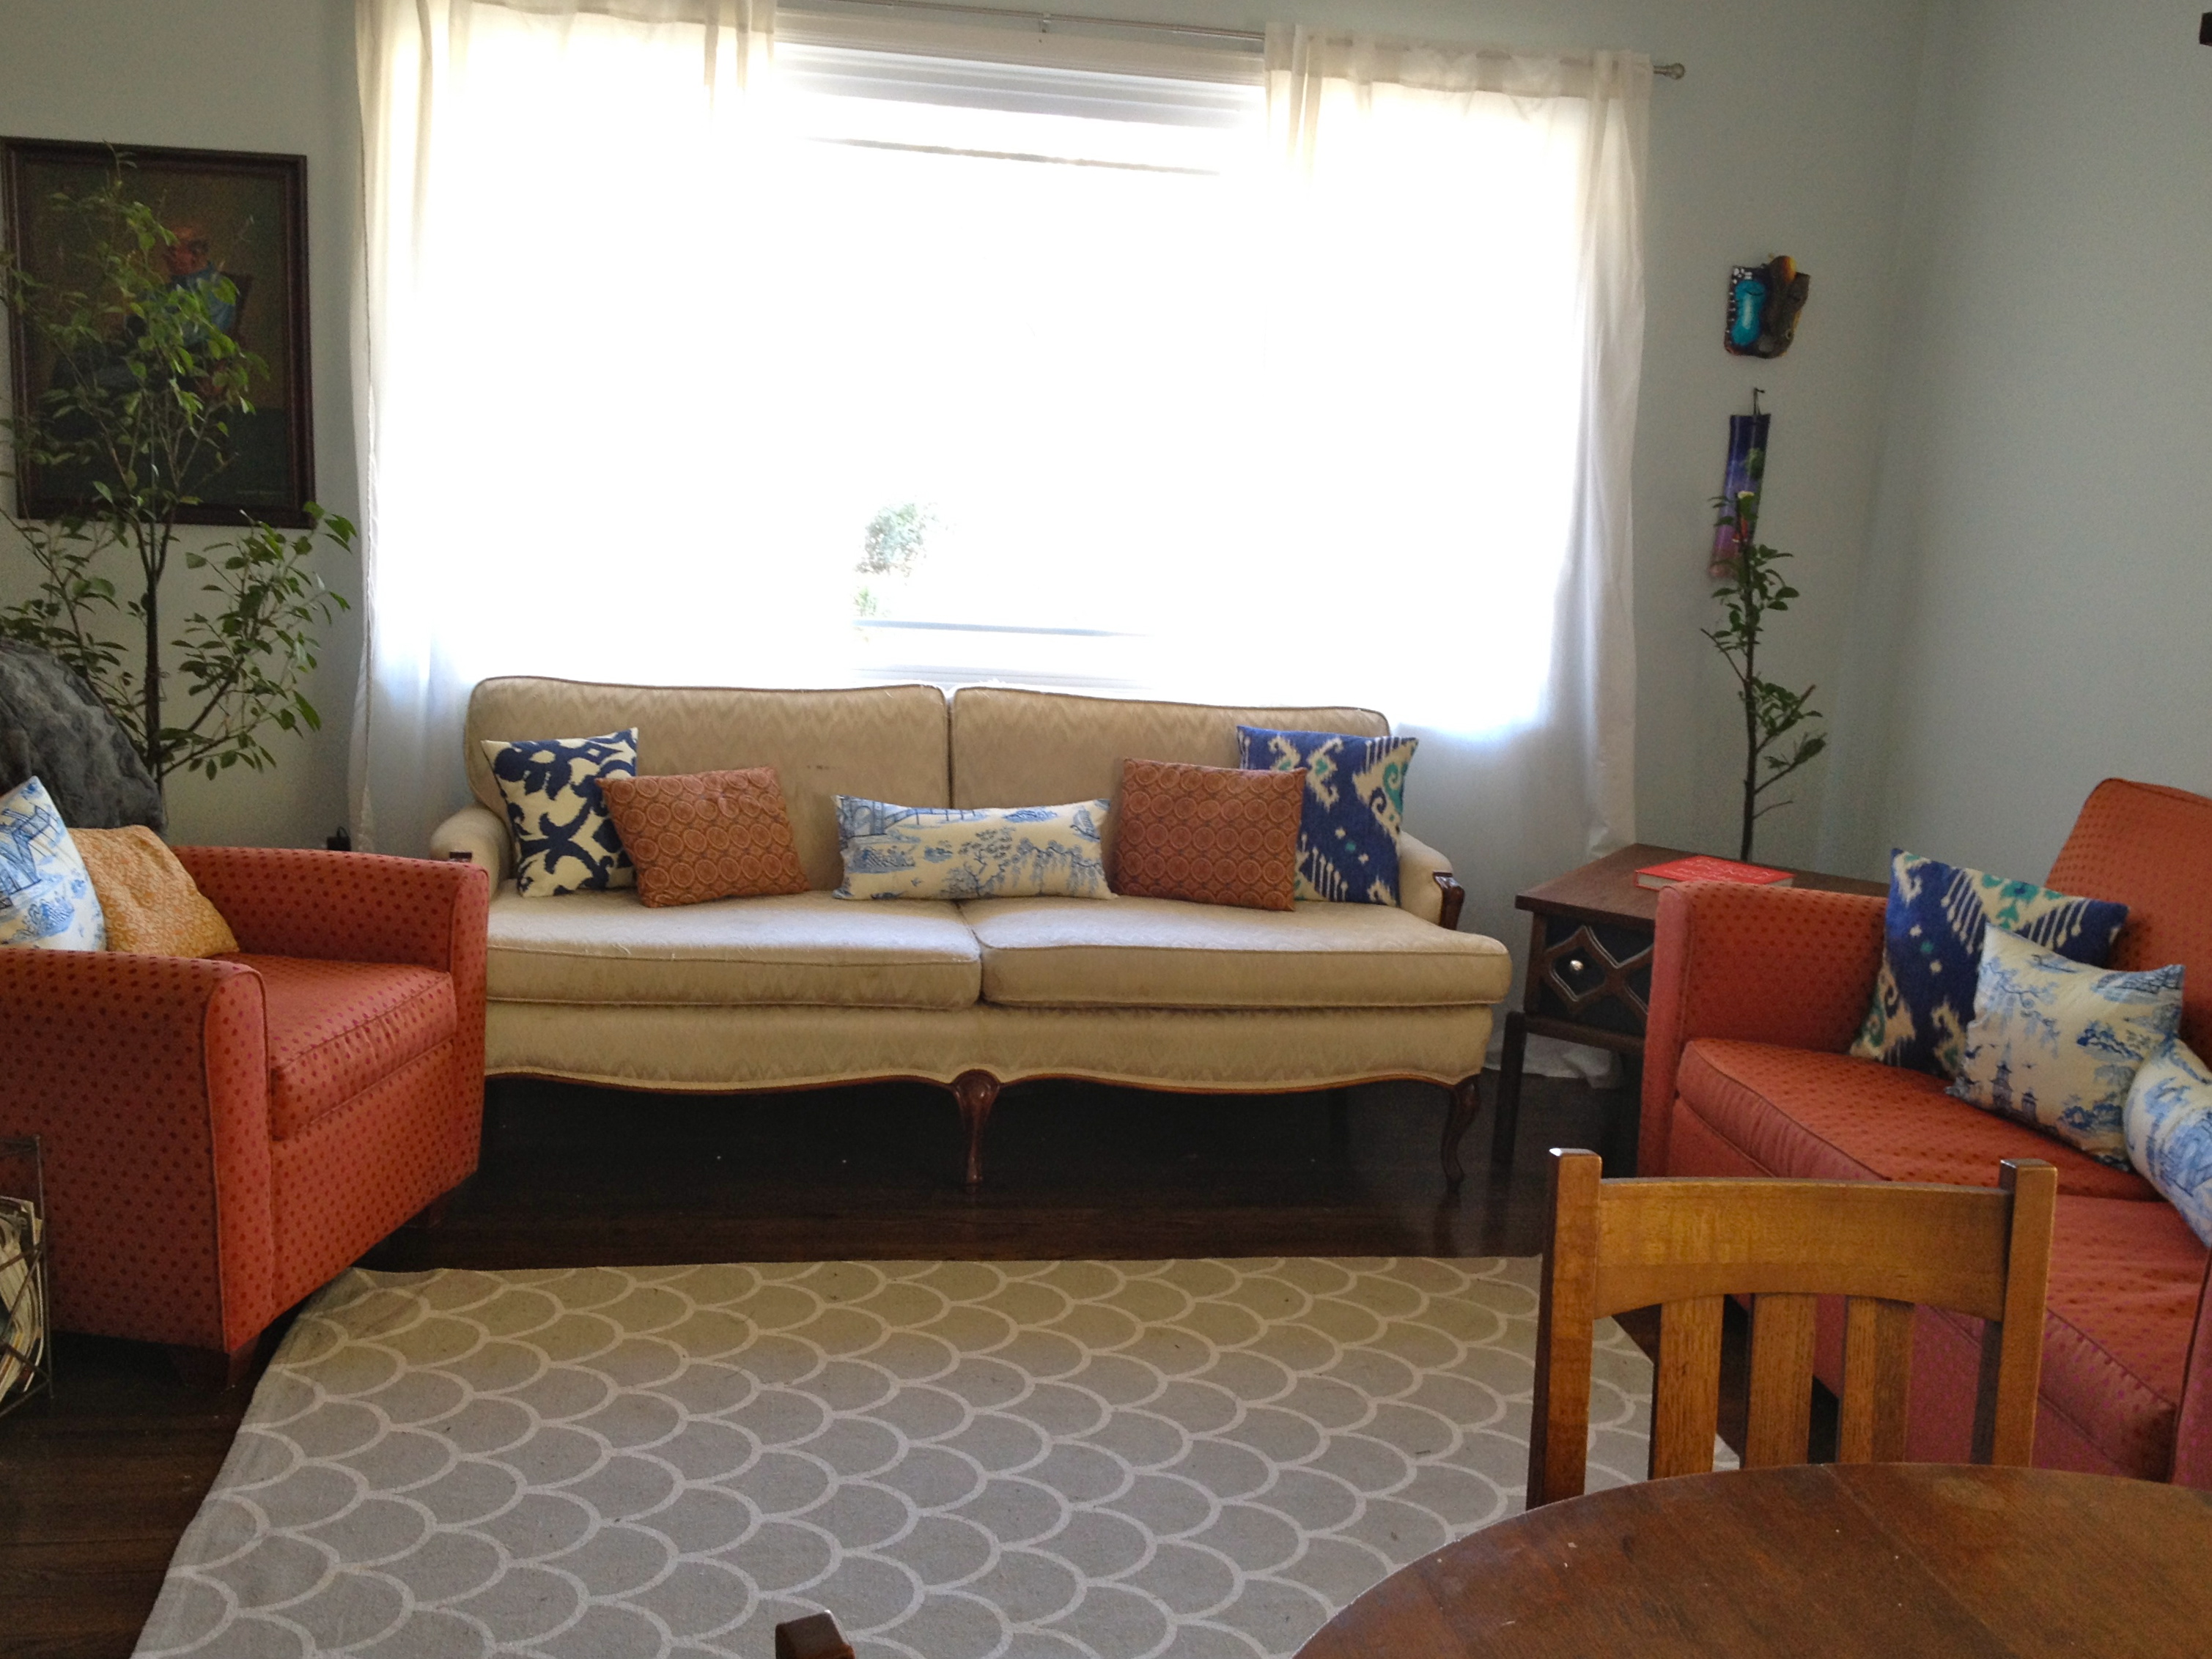
The first floor was opened up and the stairs relocated to make a great open living space. Seriously, the first time we walked in, I said to Jon, “We could totally host Meatballs in here.” We decided to keep this floor TV free, to make it a place where we could focus on spending quality time with family and friends. Though the movers didn’t think it was possible, Jon the homebrewer’s beloved kegerator managed to make it into the space. Also, the plate wall (which you may remember from our last home) didn’t go up until this week, and I swear I didn’t feel fully moved in until that moment.
Today, I’ve got pictures of what I consider the main living space of the house on the first floor. Also on this level are two bedrooms, one belonging to Etta and Claire, and one we use as an office/craft room, and a bathroom located between the two bedrooms.
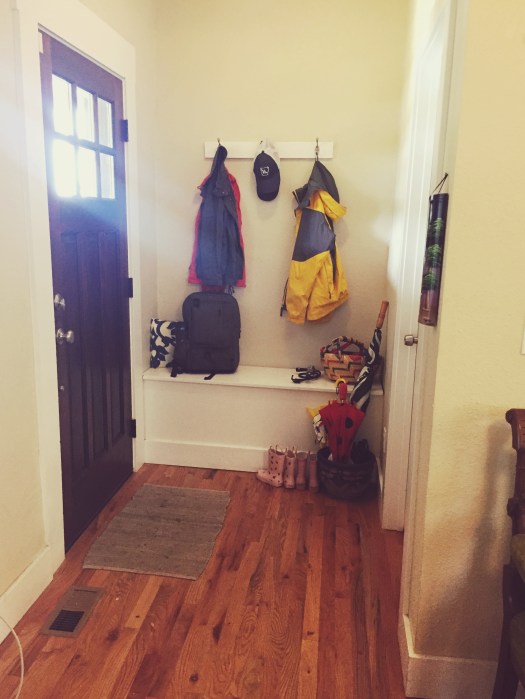
I love the entryway bench, because it lifts up for storage. Some day I’ll make it a cute cushion.
I believe in letting sleeping dogs lie, so a napping Bessie dog appears in these pics. Love ya, old girl!
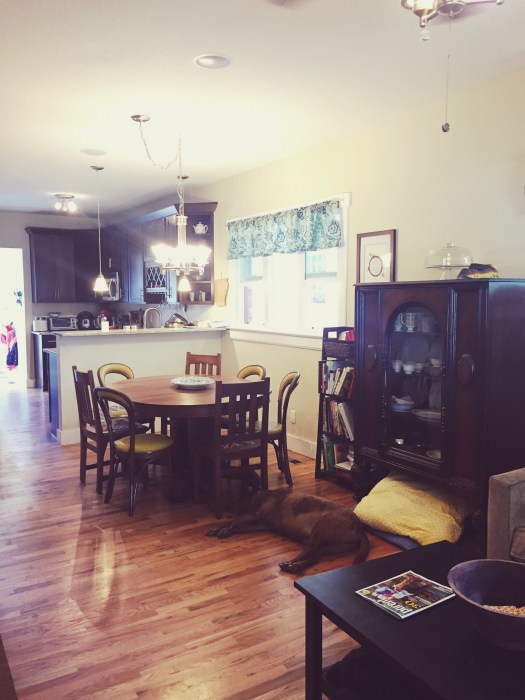
I love this little beverage area. The previous owners were wine nuts, so they had a wine fridge put in. I’m more of a cocktail girl, so mine is full of mixers and syrups along with some wine. To the right is the fridge, and the pantry is to the right of that. I kind of love these giant drawers. The middle one has become the girls’ drawer, with all their plates and cups and snacks easily accessible to them.
And there you have the first floor of our new home, minus bedrooms! I promise to share the rest of the house soon.
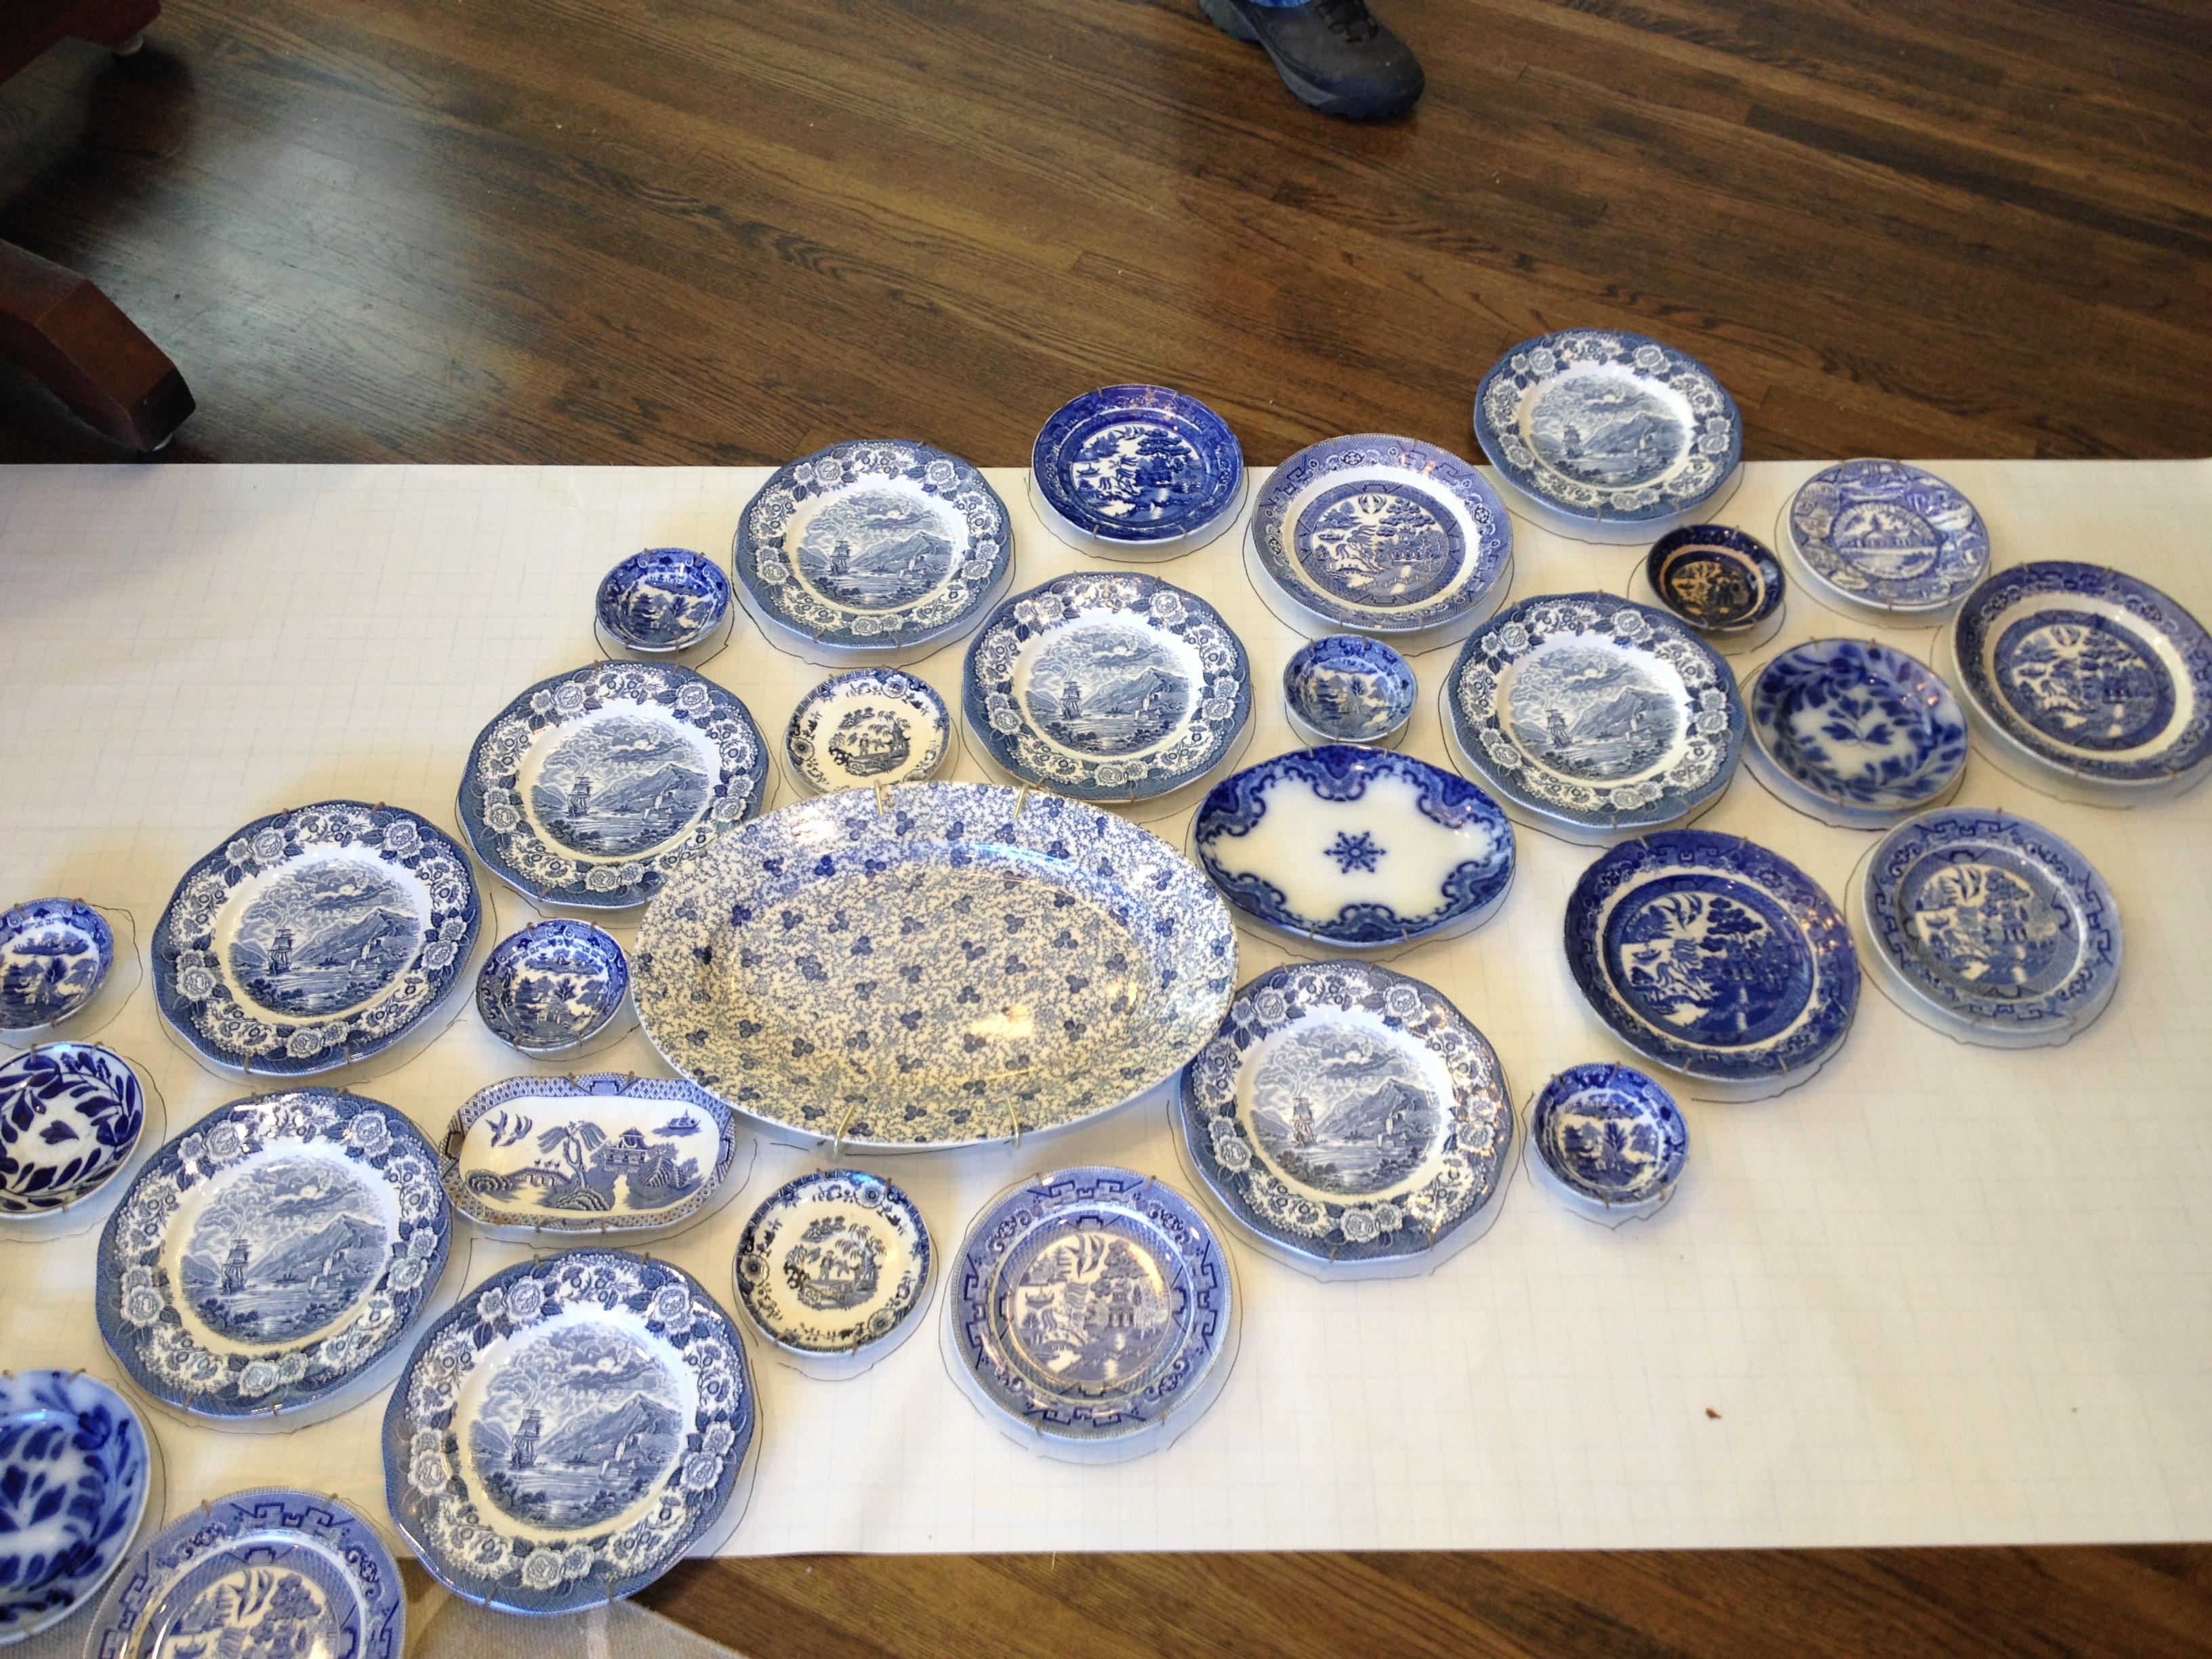
A few years ago, I inherited from my grandmother a collection of blue and white plates, some of which my grandfather had sent home from WWII to his mother. I have loved and treasured them in a cabinet for several years, but knew that the next time we owned a home, I wanted to decorate a room around displaying them. Well, we finally bought a house last summer, and all these months later, I’ve finally (mostly) finished our front/dining room.
It’s a weird space, because it’s the first room you enter after walking in the front door, and there’s a strange freestanding closet that awkwardly sits in the middle of the room, I’m guessing because there used to be more walls that were removed, but the closet had to stay for structural reasons. I think the weird closet contributed to this house being on the market as long as it was, because it was hard to picture how furniture would go and how the room would be used. For us, it’s more of our formal living area, because there’s a big den in the back of the house where we have our giant sectional and TV and all of the girls’ toys.
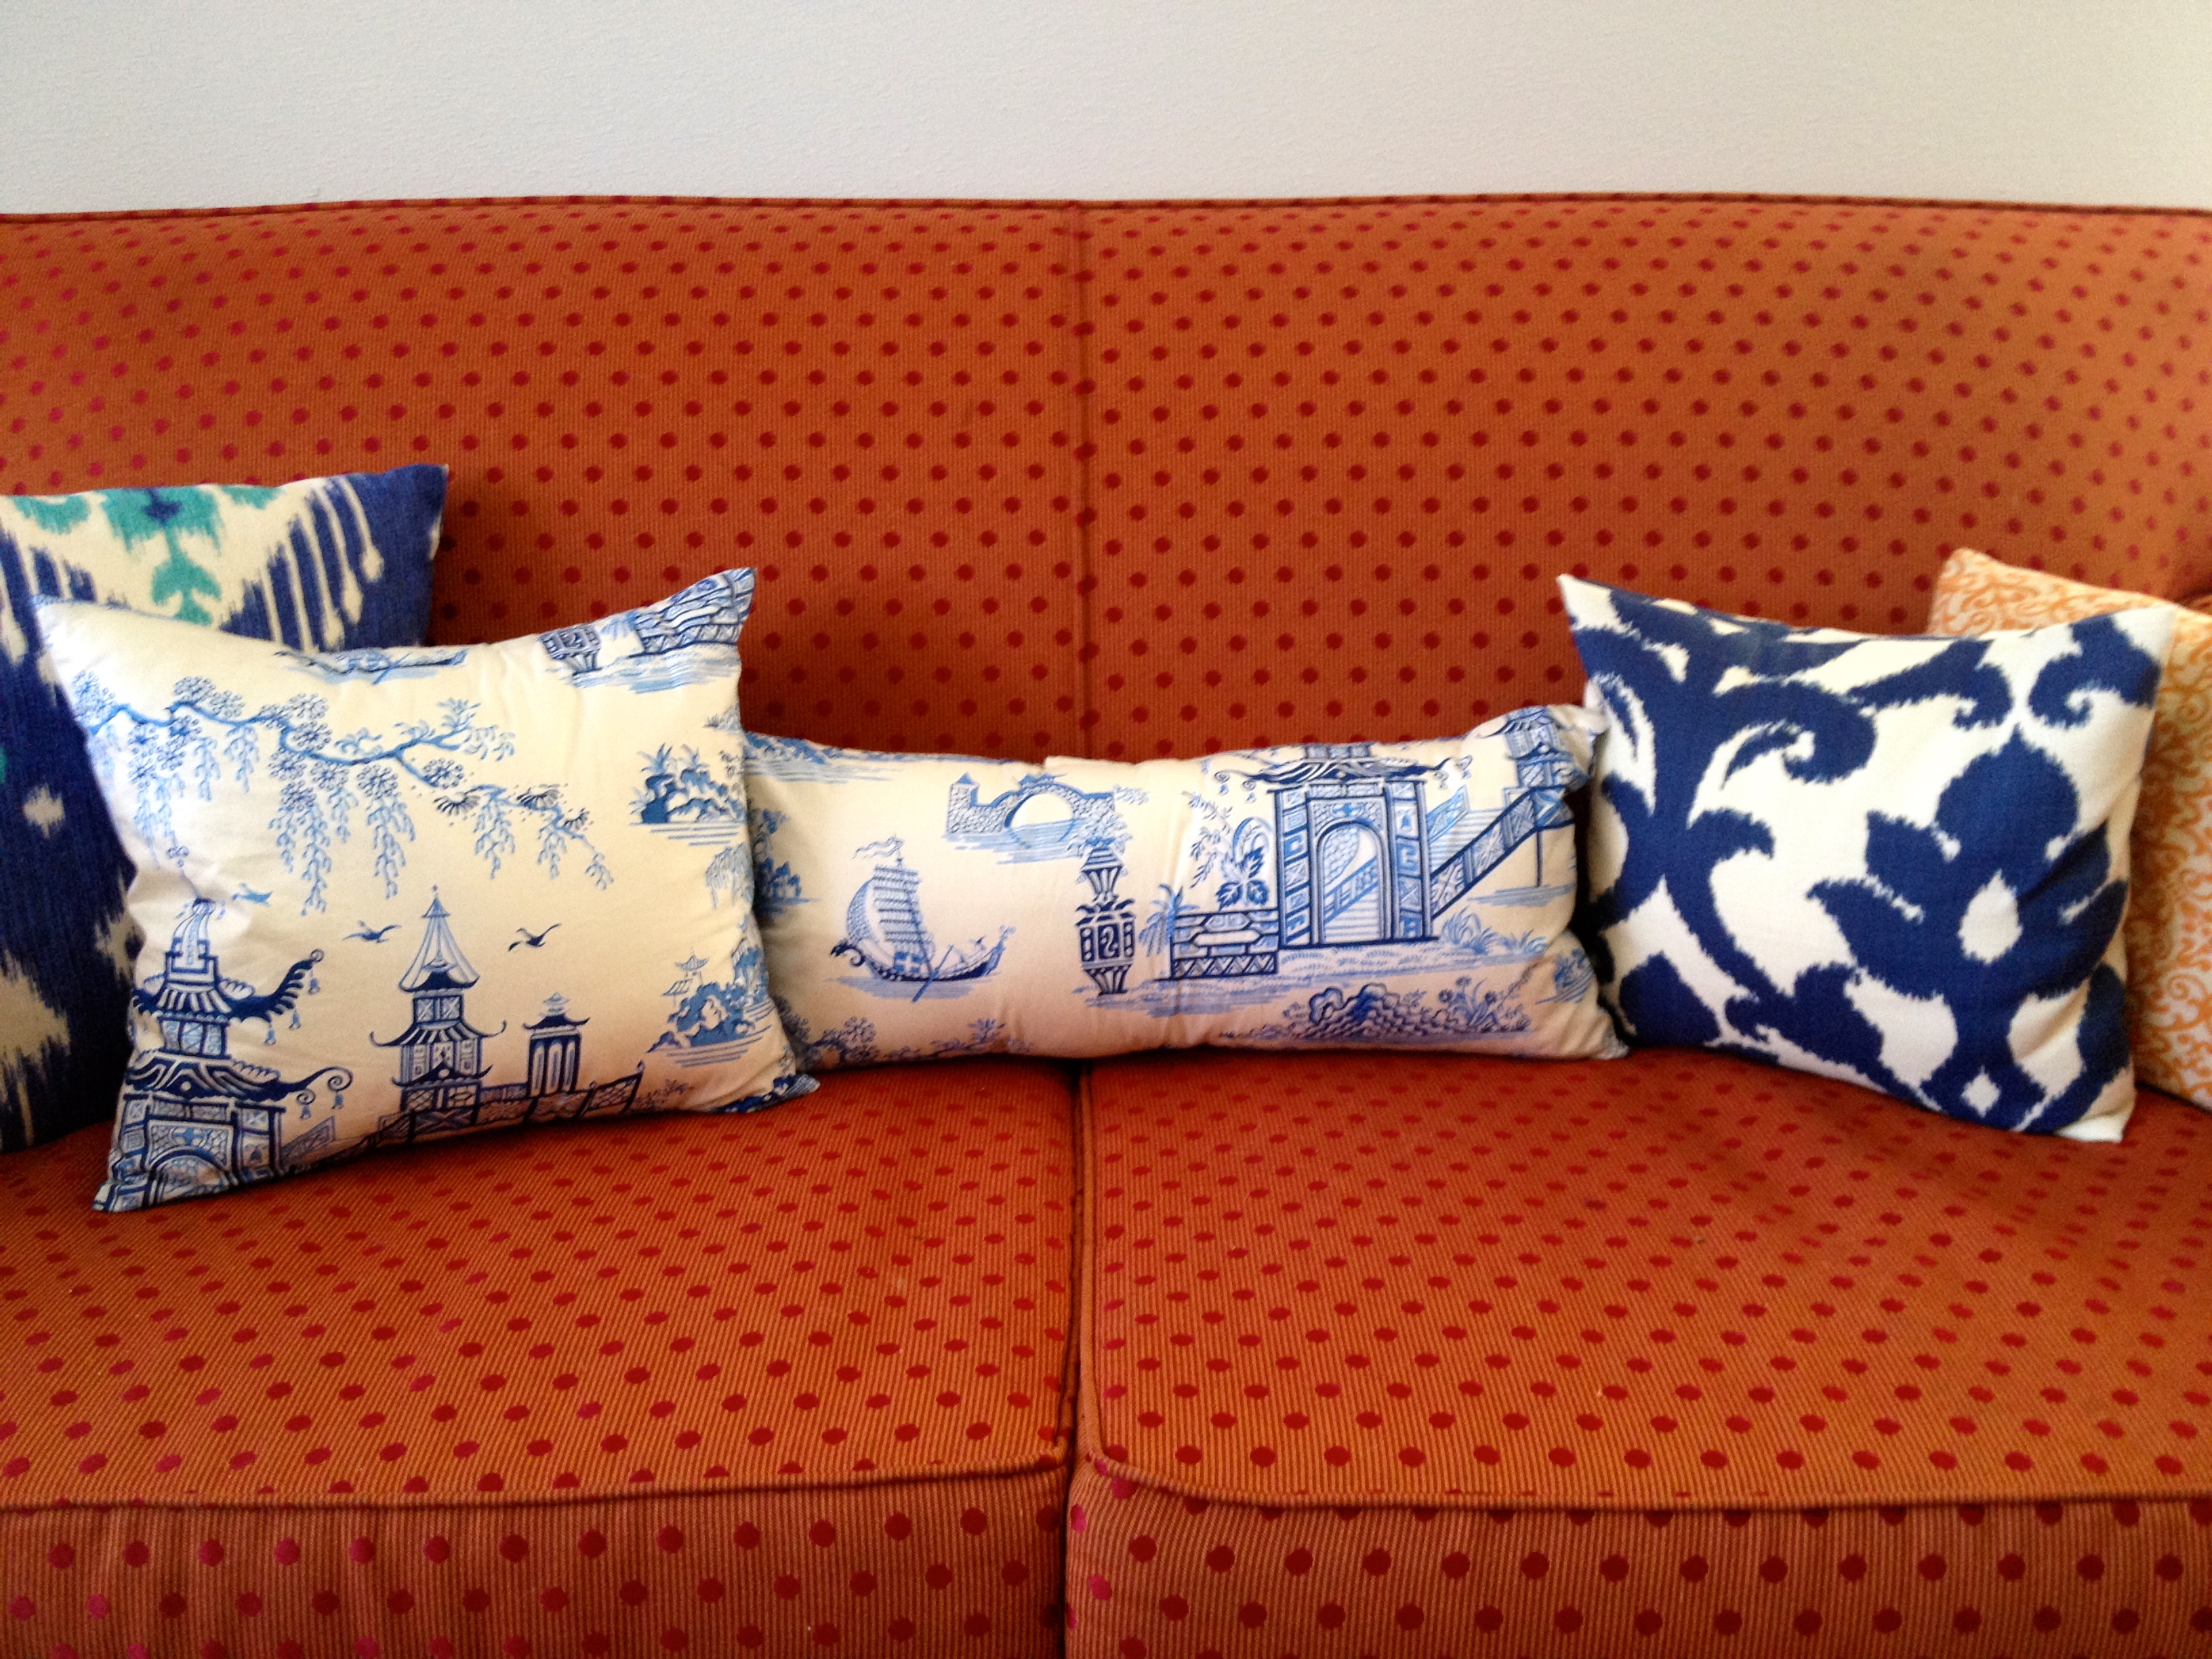
I made pillow covers (using this tutorial) in various blue and white prints to tie the plate wall into the sitting area, and I have plans to reupholster our couch and to recover the dining room chairs. I’m thinking solid colors for those, so let me know if you have ideas. The round table was a Christmas gift from my mother, who gave us her dining table after she heard me say I wanted a round table that expanded– this one has four leaves and can seat 12 with them all in place!
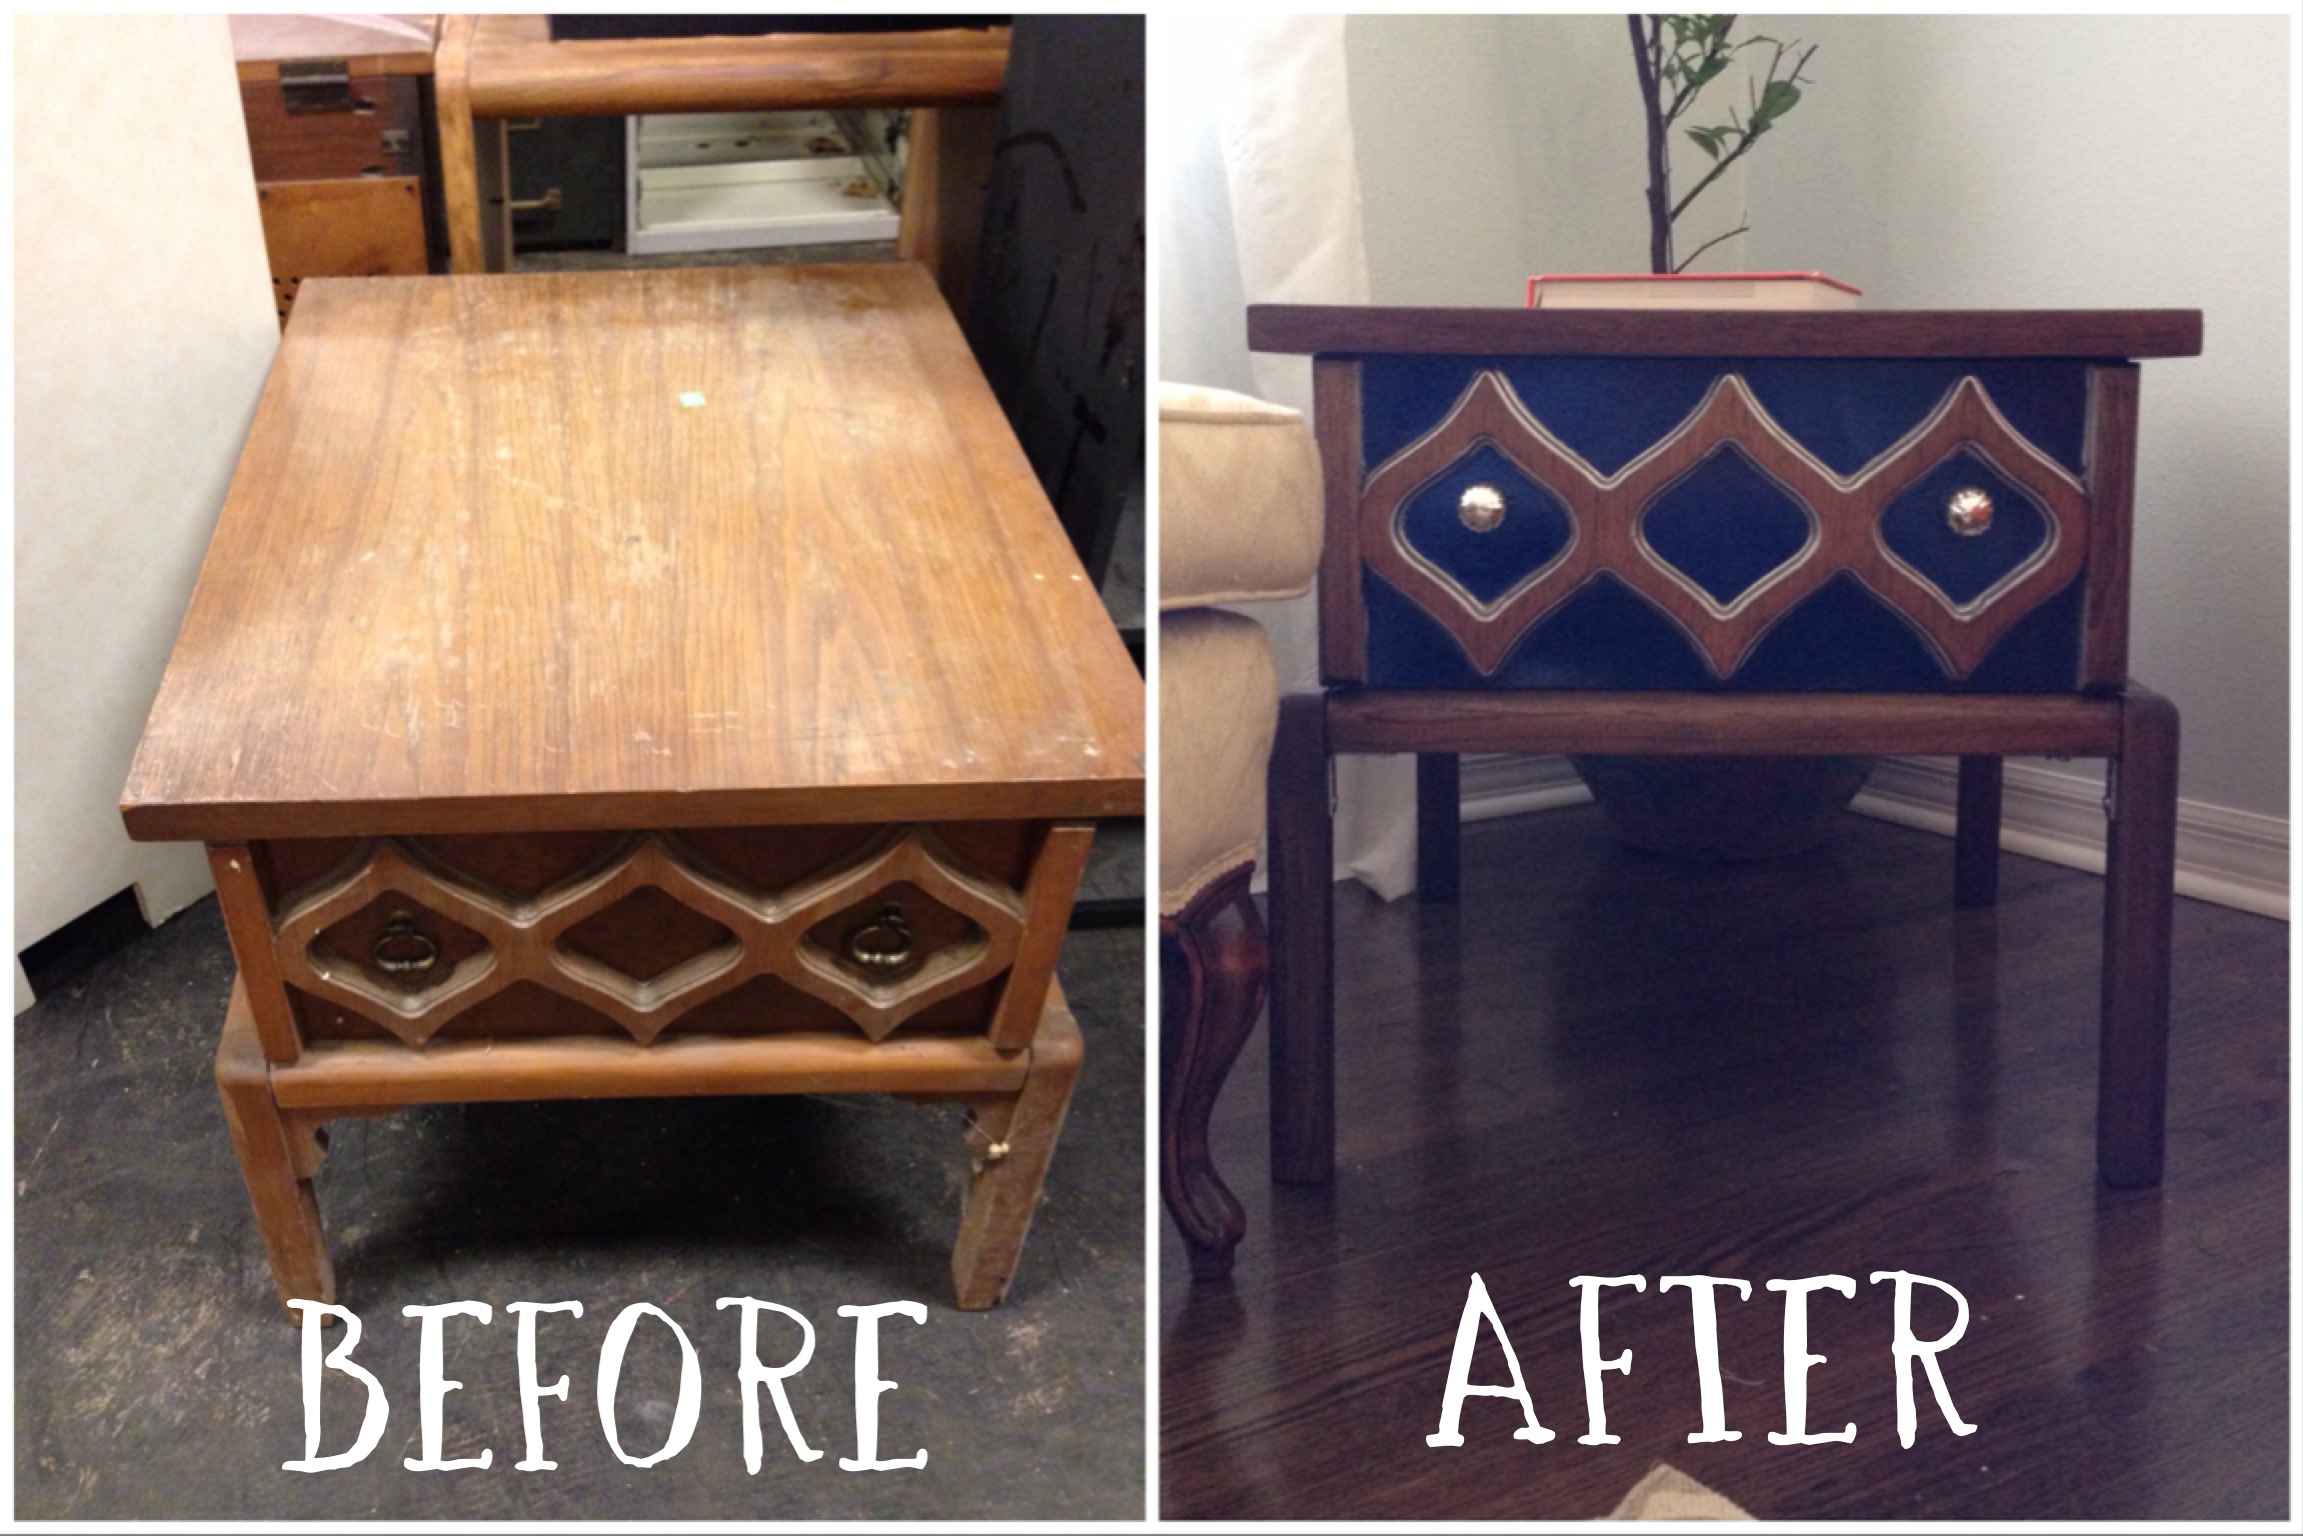
Another recent project, designed by me and executed entirely by my husband, was the remake of a thrift store end table.
The real showstopper of the room, though, is the plate wall.
In case you’d like to do a plate wall yourself, here are my plate wall tips: After asking some friends who had hung some plates, I settled on the metal spring plate hangers. I rolled out some extra wide wrapping paper on the floor and laid out the plates on top of it. Then, my husband and I traced around the plates, photographed the arrangement, removed the plates, and hung the paper on the wall. From there, we nailed hooks into the paper, and then ripped it down, leaving the hooks behind. I then referred to my photos to hang the plates on the hooks.
I love the way it turned out, and keep finding myself wandering into the dining room just to stare at the wall. It feels like something that belongs in the home of someone way cooler than we are.
We’ve been in our new place a few months now, and it’s finally getting into a state where I’d be willing to show you guys what it looks like. I figured I’d start with the cutest room: Etta’s and Claire’s.
Here’s the before:
The walls and ceilings of every single room in the new house were beige. We had all of them painted!
And here’s the after:
If you’ve seen the girls’ room in our old house, there’s not a lot different in terms of actual stuff, but with light purple walls, the whole space feels so much lighter and more fun than the dark blue floral wallpaper in our old rental.
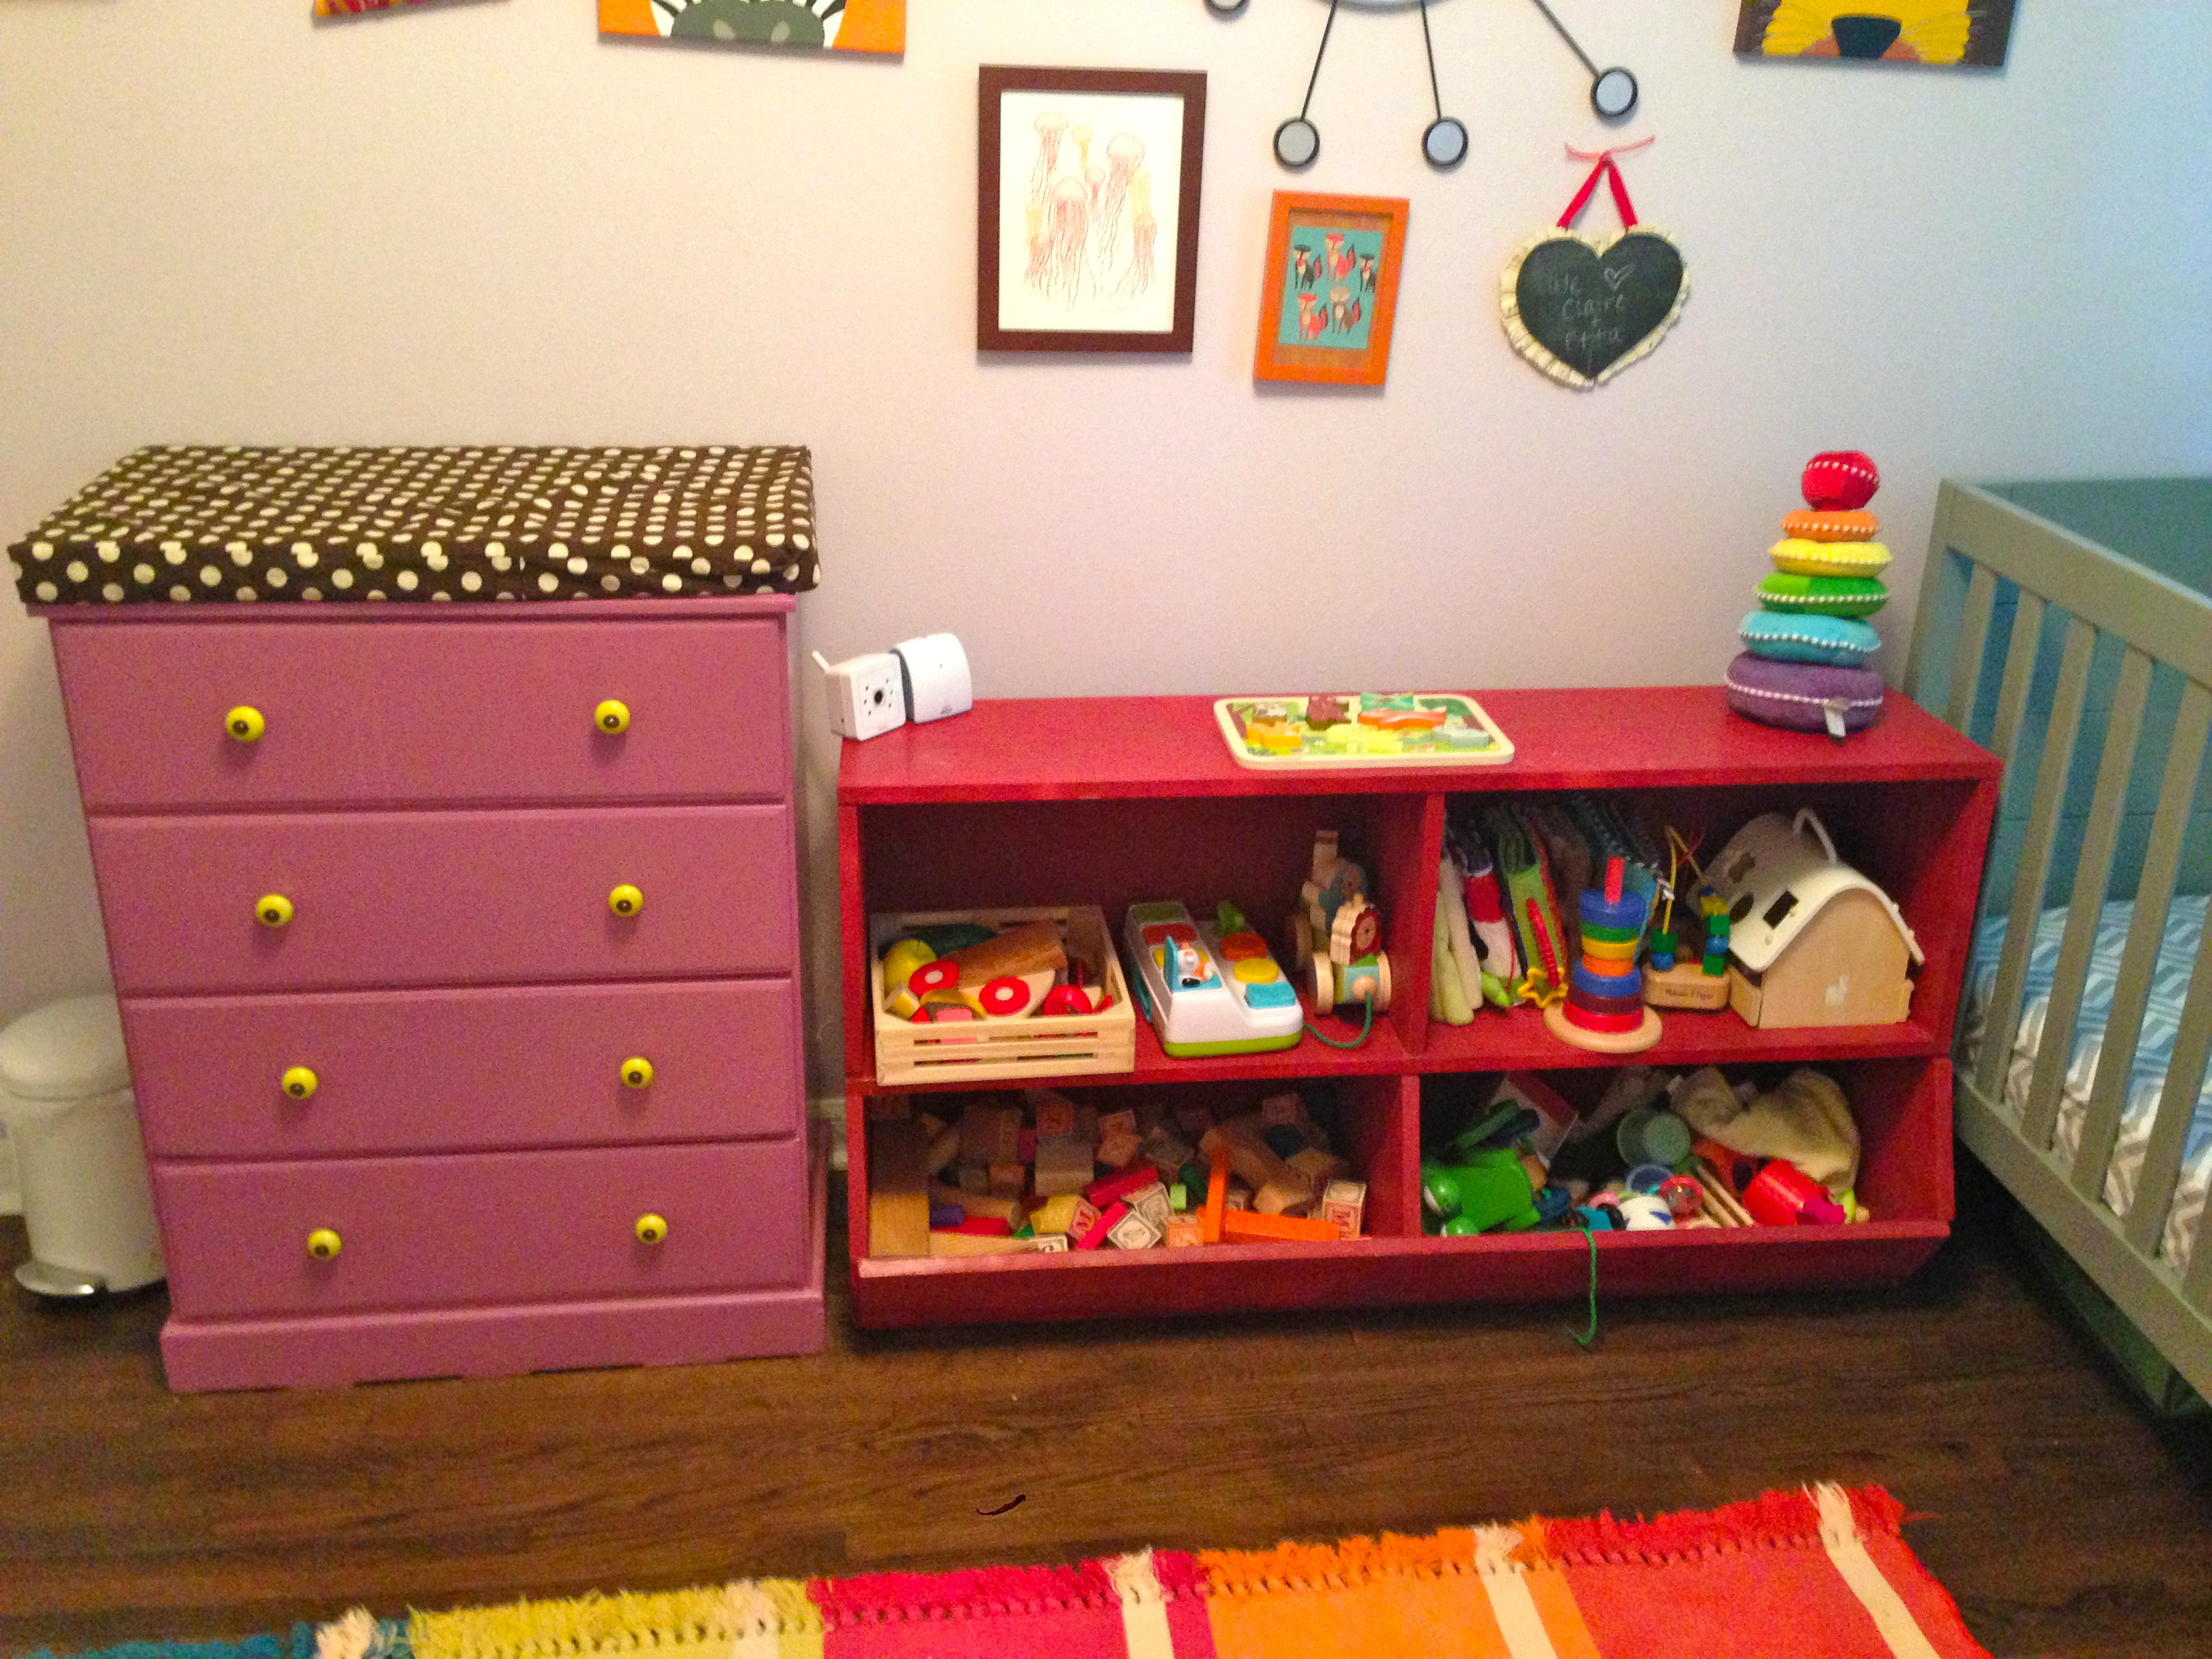
Here you see a prime example of my half-assed gallery wall methods. Some blogs will give you a tutorial for measuring and laying out a mathematically perfect gallery wall. I am not that girl. I just sort of eyeballed it. I think it turned out OK. The Vonnegut quote canvas is up a little high, but it has to be to keep little hands from grabbing at it when changing babies on the changing table.My husband built the toy shelf, and the changing table was a dresser found by the curb in our neighborhood.
I made this origami lampshade, and it’s one of my favorite things in the room.
It’s been months since I posted. It turns out life with twins as a grad student is a little busy, and then you add in the holidays, and you end up with a bit of a hiatus. I also think I’ve sort of been stuck in this rut where, unless a post is some sort of profound meditation on life and parenthood and whatnot, I don’t post it, and frankly, inspiration isn’t easy to find for the sleep deprived whose days are an endless cycle of feeding, changing, snuggling, and playing with babies. So, I’m going to try to get back into posting with less pressure on myself for every post to be some sort of major epiphany.
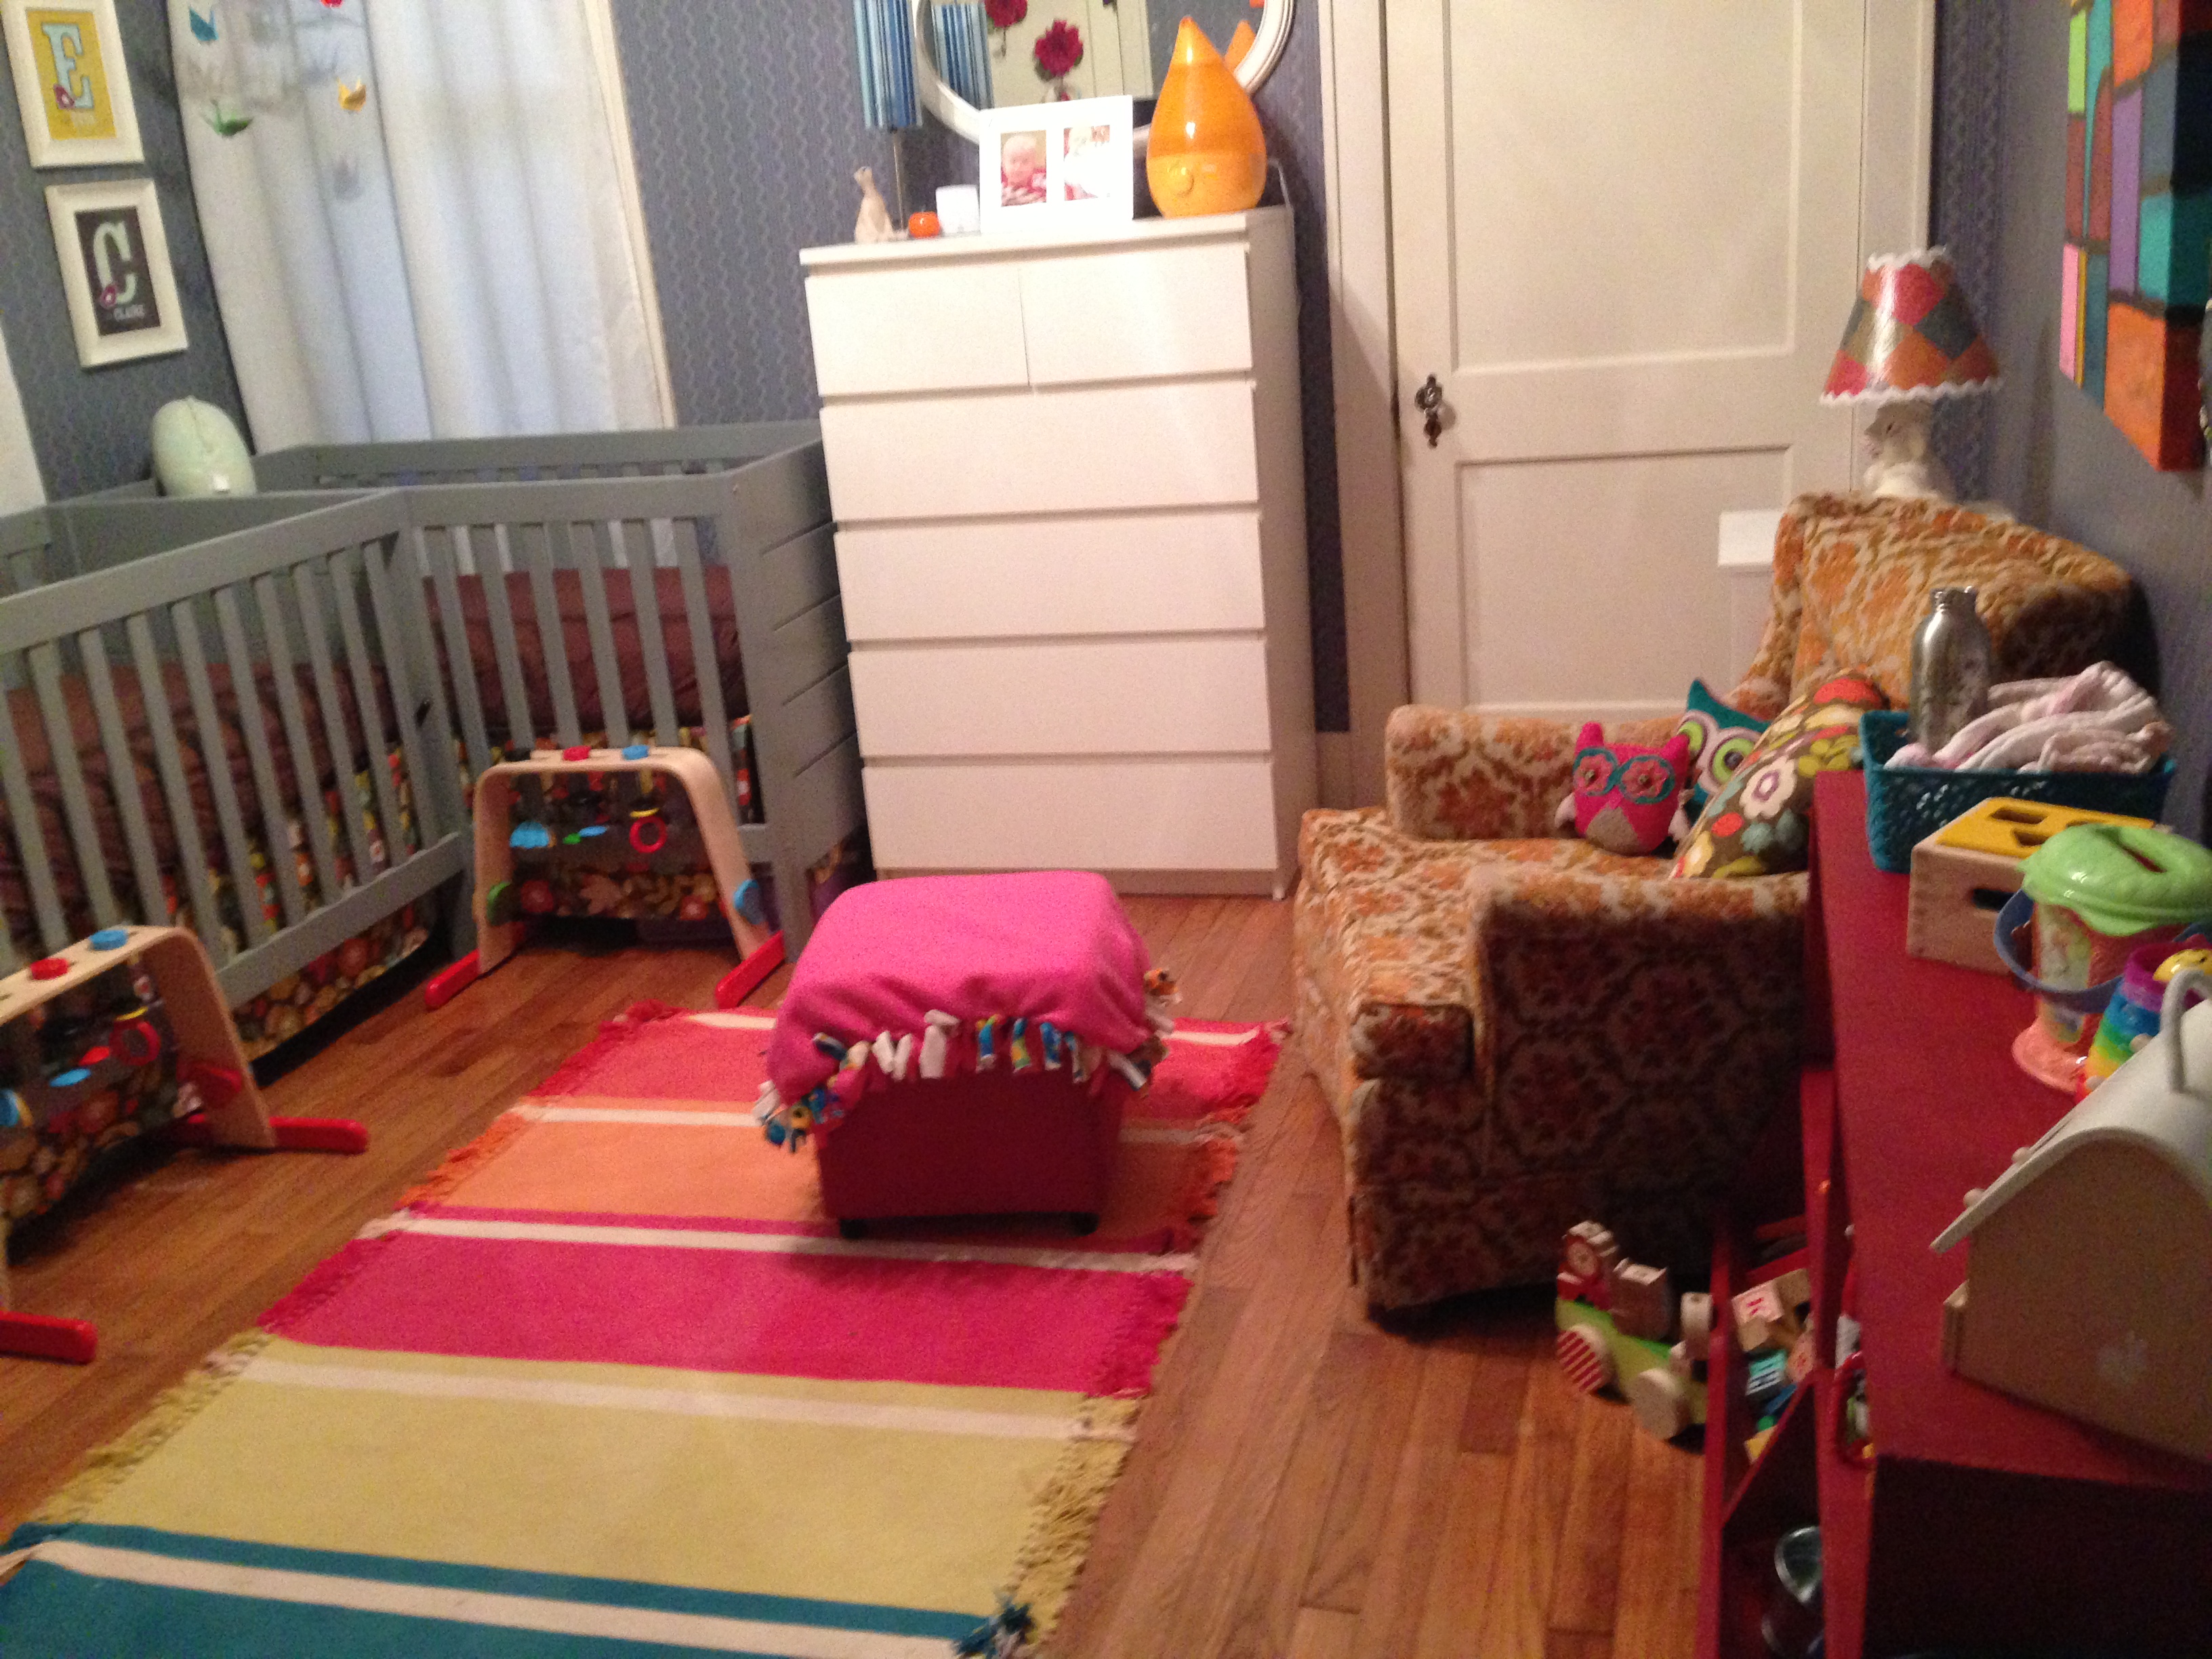
I figured I’d start with showing you the girls’ room lately, which has gone from a baby space to a space that better functions as a twin toddlers’ room. We’ve changed it around a lot to meet their needs as they are now very nearly ten months old. I know. Two months away from ONE YEAR. It’s insanity how the time has both crept and flown. (You can find the original nursery reveal here.)
I wanted the girls’ room to be more of a play space as they are now starting to be mobile and into everything, and I wanted them to have a safe space to explore. They got a lot of awesome toys from friends and family for Christmas, so we desperately needed some toy storage. Luckily, my husband is a super handy guy, and he built something amazing after seeing a few of my ideas on Pinterest.
To make space, we took out the futon and put in a secondhand chair. I will say, I am SO GLAD we had the futon for the first 8 months. Just to be able to lie down in there, or to rest the babies on either side of me in Boppies and feed both at the same time, was wonderful. I highly recommend a bed or couch in a nursery.
Anyway, here’s the space now, with before and afters for comparison.
Then:
Now:
Then:
Now:
Here’s a closeup of the new toy storage, built by my awesome husband!
The girls can crawl right up and grab blocks and toys out of the bottom bins, and if they’re sitting up, they can reach the shelf. As soon as they’re pulling up, it will be even more accessible. It was important to me that the toys be in view so they could easily see their options and get them for themselves. I had a feeling this would work better than a box or bin, because stuff on the bottom of a bin would be forgotten and never played with.
Then:
Now:
Here you can see the bucket we got to store stuffed animals, as well as one of my favorite things in the entire room, the canvas with the Vonnegut quote. It was a gift from a friend I met through Twitter, a “you survived” gift after all I went through getting the gals into the world. It is from a story in which a character is delivering a baptismal speech for twins, so it’s super apt. It says, “Hello babies. Welcome to Earth. It’s hot in the summer and cold in the winter. It’s round and wet and crowded. On the outside, babies, you’ve got a hundred years here. There’s only one rule that I know of, babies– You’ve got to be kind.” I think it’s a great rule.
Overall, the girls have the best-decorated room in our house, and we still haven’t bought a single new piece of furniture beyond the cribs, which were a gift from their grandparents. As I type, the girls are playing in the floor and I’m sitting in the chair.
BIG NEWS: Etta and Claire will be born tomorrow! Our c-section was originally scheduled for this coming Monday, 4/2, but at my appointment this morning, my blood pressure was elevated, I had started to retain a lot of fluid, and Claire wasn’t as reactive on the monitoring as the doctor would like her to be. My doctor said my body and the babies were telling her that it’s time for them to come out. Initially she was talking about getting them out today, but Claire perked up a bit with further monitoring, so we bought ourselves until tomorrow morning, first thing.
I’m glad, because we still had a lot to do: finishing touches on the girls’ room, finishing thank you notes for shower gifts, straightening up the house a bit, and packing a bag for the hospital. In fact, right after the doctor told us tomorrow would be baby day, I said to Jon: but we have to finish the room and I have to take pictures so I can blog it before they come!!! Clearly I’m an insane internet weirdo. But hey: check out our babies’ cute room!
This is the view standing in the doorway of the room. I didn’t set out to have a themed room, but it quickly developed a color palette based on the crib skirt and pillow fabric, and we ended up with a bit of an animal thing going on. What I am most proud of about the room are all the handmade touches, by me and by other folks who love Etta and Claire, and of all the stuff that we already had that we were able to repurpose for the room. The only new furniture we bought were the two cribs, which are BabyMod from WalMart and were a gift from my family. The white dresser, from IKEA, we already had, the little yellow table used to be a nightstand in our guest room, the futon was in our living room, the white tables on either side of it were in our bedroom, and even the rug, which strangely matched perfectly, we already had from IKEA.
This is the view from in front of the bathroom door. Bonus Tinycat sighting! The purple dresser/changer is one of the coolest repurposed items in the room. Our friend Sean found the solidly-built dresser by the curb while walking his dog and carried it home for us. Jon refinished it, and I found the cutest green knobs on sale for half off (which made them $1.50 each) at Hobby Lobby. It’s chock full of our cloth diapers! The four animal paintings were painted by my dad after some he saw in a catalog. They were the first animal items we got for the room, which is what led to the unofficial theme.
I knew right away that a traditional rocker or glider wasn’t going to work with two babies, but wanted a comfy place to nurse and snuggle. So we moved a futon out of our living room, and it fit great! This way one of us can sleep in the room with the babies if we want, and if anyone is ever crazy enough to want to come stay with us, we still have a space for guests to sleep. Tinycat also thinks it’s a great nap space. Everything hanging over the futon is something we already had somewhere else in our home.
Another awesome handmade touch in the room are these name prints by my awesome friend Christen, whom you may remember from our maternity photo shoot. She’s not just a super talented photographer, but makes adorable prints, which you can purchase from her Etsy shop. I love that they don’t match exactly, but go together just perfectly!
And that’s the room! I can’t believe that after tomorrow, we’ll have BABIES in those cribs!
To me, one of the more fun things about being pregnant is fixing up a room for the babies. I knew from the start I wanted to avoid having a “theme.” None of the rest of my rooms have a theme, so why should the babies’ room look any different? I wanted their room to look like it belonged with the rest of the house, and I knew I had to work with the navy blue floral wallpaper that we renters can’t change. So my goal was to incorporate lots of color and lots of handmade touches to make a room that goes with the rest of our house. I figured I’d share some of my progress so far:
The cribs are actually the only “new” thing in the photo, and they’re BabyMod from Walmart. Cribs were a tough decision for me, because I originally really wanted bright red cribs, which apparently do not exist. Then I thought I’d paint unpainted cribs, which also do not exist, unless I want to pay a zillion dollars or drive 4 hours to the nearest IKEA, which, it turns out, didn’t have the unpainted ones in stock anyway. So we ended up with gray cribs that actually blend surprisingly well with the aforementioned wallpaper. The dresser we already had, and there are three smaller nightstands in the room that we also already had. Even the rug was something we already had.
Early on, I decided moving our futon into the babies’ room made more sense than getting a glider, because this way, I could set the babies down on the couch, sit down in between them, and still feed them even if I were home alone. Also, the futon still functions as a place for guests to sleep, in case anyone wants to stay in a house of craziness, or for one of us to sleep in the room with the babies. It’s actually an espresso brown, I just have a sheet on it to protect it from Tinycat’s hair, since he likes to hang out in there.
To go on the futon, I made 4 throw pillow covers with fabric I happened to already have in my stash, that I think goes well with the rug:
And for Christmas, my dad made these four paintings to go on the wall: I think the animals are super cute, and he did a great job choosing colors that go with the other things in the room.
Now, while we’re not doing an animal theme, there will be some other animal touches, including some letterpress prints I already had around, and a vintage lamp my stepmom found at a flea market:
I immediately loved the little elephant, but knew I wanted to do something to spruce up his bland, faded shade. Initially, I thought of trying to cover the shade with the same fabric as the throw pillows, but since I’m making the girls an origami crane lamp like the one I made for my friend, I decided to incorporate the same origami paper I’m using for the cranes to make the two lamps “go” together. I cut each sheet of origami paper into 4 smaller squares and ModPodged them to the lampshade in a patchwork pattern. Then I glued some rickrack trim around the edges. I’m really proud of the results (though everything I ModPodge comes out a little wrinkly), and think the patterns of the paper echo the pattern of the wallpaper in a nice way:
I still need to figure out some sort of changing table/dresser, want to get an ottoman, need to hem curtains, and am planning to sew some crib skirts, among other things, but I’m pretty proud of how the babies’ room is looking so far. I don’t think it screams “baby” or “pretty pretty princess” but it’s still girly and fun and colorful. I can’t wait to get it finished!
One of my BFF’s (technically half of our BCFFL (Best Couple Friends 4 Lyfe)) is having a BABY GIRL!!! We’re very excited for our friends, and I fully intend to be this kid’s Crazy Aunt Sarah. My friend is a really awesome, creative, crafty, thrifting queen, so I knew I really had to step it up in the gift department. You can check out her awesome Etsy shop of vintage treasures, if you want!
My friend and I looking cute on the Subway, sharing some tunes, on Jon's big 30th Birthday in NYC trip.
Ultimately inspiration struck in the form of this origami lamp from Sweet Sweet Life, which I think I originally found via Apartment Therapy’s Ohdeedoh.
image via Sweet Sweet Life.
That lamp was inspired by a lamp that costs over $210. And I thought, I have origami skills! I could do that! $200+ is ridiculous! Though I’ve been into origami for a while, I really honed my skills when I got laid off in October of 2008 and decided to use my abundant free time crafting origami Christmas ornaments.
The great origami Christmas ornament project of 2008. I made garlands out of tiny boxes, ornaments out of cranes......and origami ball ornaments.
Of course, I wouldn’t just make a giant origami lamp for someone’s nursery without asking, but I remembered my friend liking the lamp when I posted about it on Facebook. So I shot her a quick note and asked if she’d be interested in an origami lamp for the baby’s nursery, and she said sure! I inquired about the color scheme: “i’m planning on doing olive green, lime green, fuschia, light pink, lemon drop yellow and lots of wood grains, burlap and galvanized steel (like those buckets)… if that helps”
So I headed off to Hobby Lobby, where, to my luck, scrapbooking paper was on sale for half off! I selected a variety of large squares, which are normally $0.59 apiece, in the colors she had mentioned, supplementing with traditional origami paper in coordinating colors. After that came the folding. Holy crap, what a lot of folding. I’d say it takes about 250 cranes to cover a typical lamp shade. Luckily, it’s an activity you can do in front of the TV, and luckily for me, Jon knows how to fold cranes, and he helped me with my folding load. Still, I’d say it was about 12 hours of folding…so THAT’S why they cost over $200. You can follow this tutorial video to learn how to fold an origami crane.
A big pile of cranes, ready to be hot-glued onto a lampshade from Target.
I applied the cranes to the lamp with a hot-glue gun, which took about 4 hours, during which time I watched “The West Wing” on my laptop– I’m newly hooked on the show, having missed it when it originally aired.
I'm going to let my friend choose whether to use this as a hanging lamp or on a standing lamp, so I put the shade on one of my lamps to show off the finished product.Here's what it looks like with the light on.Closeup of the cranes on the lamp. As you can see, I managed to find paper that actually looked like burlap and wood grain. I think I did a pretty good job coordinating with my friend's color scheme!
So, there you have it. The Coolest Lamp in the World. The World’s Most Ambitious Origami Lamp Project! All you need is: a lamp shade, a glue gun, enough paper for around 250 cranes, and a crapload of free time.