Easy DIY: The InstaFridge

IMG_4836
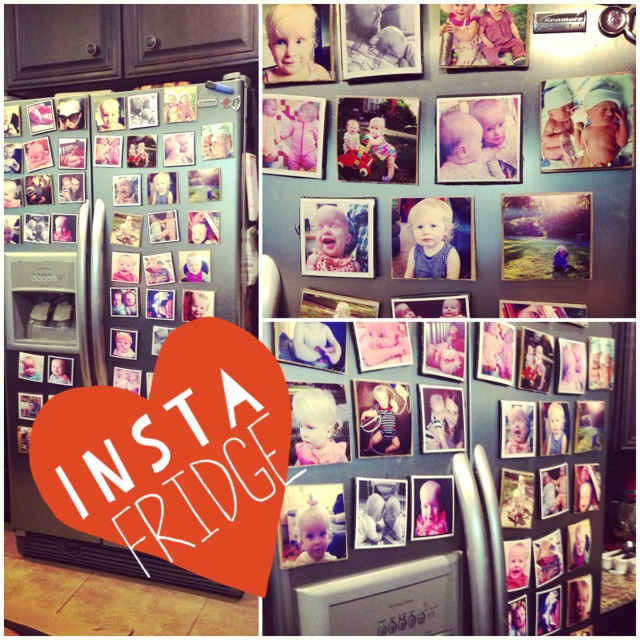
Check out my fridge, covered in pictures of my babies! You, too, can achieve such a cool (ha) fridge!

Here’s the deal: there are companies that will make you magnets out of your Instagrams (and lets be real, the best pictures any of us are taking these days are on Instagram), but they charge $15 bucks for 9 magnets, and they aren’t very big. Meanwhile, I was recently informed by a friend that Walgreens has a cool new app that, among other things, connects directly to your Instagram and prints 4×4 prints at your nearest store for you to pick up in just an hour or two. For 39 cents a pop. So, using my rudimentary math skills (aka a calculator, because I am an English and Poli Sci major, and math makes me cry), that’s $1.27 cheaper than the pre-made magnets per picture. The savings shrinks a tiny bit when you take the added step of turning the prints into DIY magnets, but bear with me:

Supplies:

1 sheet foam board, or, if you’re extra thrifty, 1 cardboard box

A bunch of Instagram prints

Photo Corners (like these, which are less than $5 for 250)

Craft magnets (Amazon sells bazillions for like a nickel each) + glue gun if you don’t get the magnets with adhesive backing

Scissors

Steps:

  1. Affix pictures to cardboard or foam board using photo corners
  2. Cut out squares
  3. Glue and/or affix the magnets to the back of said squares
  4. Stick all over your fridge
  5. Laugh at schmucks paying $1.20 more per magnet for their StickyGrams that look tiny and puny next to your awesome creations

The bonus of using the photo corners as opposed to gluing the pictures directly to the foam/card board is that you can easily change out the pictures and reuse the magnets over and over again! Which will work great for me as my whole fridge is pictures of the Bufflo Gals, and they tend to do this pesky growing up thing, which means I need to update the pictures regularly.

put a bird on it! DIY origami lamp and mobile

Are you ready for more of my baby room crafty craziness? Here it comes!

Origami has long been a hobby of mine, at least since high school. I find it repetitive, mindless, and relaxing, a great project to do with my hands while I watch TV. One year, while unemployed, I made a ton of origami Christmas ornaments, and was sure glad to have them as unbreakable ornaments this year when I first encountered the combo of Tinycat+Christmas tree. I knew I wanted to do something origami-related for Etta and Claire’s room, and after my success making an origami crane-covered lampshade for my friend Naomi, I decided to DIY another origami crane lamp. Consider this a bit of an origami crane lamp tutorial.

First: you need a LOT of origami cranes. Obviously this varies depending on lampshade size, but I’d say at least 200, maybe more. (If you don’t know how to fold a crane, I highly recommend YouTube. It’s so much easier when you can watch someone’s hands actually folding instead of trying to decipher diagrams.)

A lot of evenings were spent in the recliner with Tinycat folding cranes. He wasn't very helpful, but he sure is snuggly!
I folded enough cranes to fill this bag, then got started and realized I needed about 50 more. This is why it's helpful to have more paper than you use, so if you fold more, they'll still match the rest of the group.
Then, hot-glue the cranes to your lamp all haphazard like.

I’m really proud of how the lamp turned out, and particularly in love with the cute turquoise base we scored on sale at Target for about $20. Here’s what it looks like in the girls’ room:

In the end, I actually had some cranes left, so I started thinking about what I could do with them and realized they’d be perfect for a mobile. I bought some small grapevine wreaths from Hobby Lobby for $4 each to use as the base of the mobile, and picked up a $3 spool of crochet thread to string the cranes on. Other than that, I already had ribbon, cranes, and beads, so this ended up a very cheap project! I learned while making crane ornaments that a bead under the cranes keeps the knots in the string from pulling through the fragile paper, and I used a large needle to string the cranes onto the thread. I’m really proud of my finished mobiles and can’t wait to see them hanging over the cribs! (That will be a project for Jon. I have a feeling I should avoid ladders.)

Just for the heck of it, I decided to see if anyone on Etsy was selling anything similar. I told Jon, “I bet people would pay $30 for these!” Sure enough, the one origami crane mobile seller I found was selling hers for $28 apiece, and they didn’t even have cute nests/wreaths, just plain old hoops! Not bad for something made largely of things I already had!

%d bloggers like this: