the good place valentines

My current favorite show and light of my life is “The Good Place.” Every character on it is so pure and good and wonderful, and it’s so smart and hilarious. I think the entire cast is my new fantasy dinner party. Inspired by my love of the show, I decided to create some “The Good Place” valentines, and they amused me so much, I decided to share them here. Feel free to print one out and give it to someone you’d like to mash food holes with this Valentine’s Day. (Shoutout to my friend Rebecca for helping me brainstorm some of these!)

IMG_7993IMG_7994IMG_7995IMG_7996IMG_7998IMG_7999IMG_8001IMG_8003IMG_8004IMG_8005IMG_8007IMG_8008IMG_8009

IMG_8010.PNG

super easy, no-candy valentines that will make your slacker butt look like a pinterest parent

I get that Boomers are like, OMG Millennial Parents And Their Special Snowflake Children. They see our birthday parties and class Valentines and think we’re a bunch of overachievers. And while I’ll cop to going a little overboard on birthday parties, my Valentine game only looks like it took me a ton of time. Our school has never let us bring candy or food items, and frankly, with food allergies what they are, I don’t really want to risk it. The good news is, party favors plus free printables that other overachieving parents make available online equals class Valentine’s win. I’ve made it even easier for you by rounding up some awesome options (if you can’t see the images in your RSS reader, click through to see embedded pins):

Every kid loves bubbles. Cute Valentine bubbles available via Target. You can get 16 for $3. Cheaper than a bag of candy.

I used this idea for Claire last year. Play Doh party pack available at Target for $6.

Mustaches are fun! Target even has Valentine mustaches, because of course they do. 16 for $3.

My kids love tiny things. They carry around purses full of them. Zoo animals via Amazon.

Also in the tiny things category: bugs! Bugs via Amazon.

Turns out bouncy balls look like planets. 12 bouncy balls for $3 at Target. Here’s an alternative bouncy ball printable.

I know my girls would love these heart glasses. 16 for $3 at Target.

Glow sticks are always fun. You can get 100 for under $9 on Amazon, with Prime shipping.

If your kid loves dinos, these are perfect. You can get 72 for $8 on Amazon Prime.

And if you hate the other parents in your kid’s class, give the kids kazoos. Almost as bad as giving a kid a whistle. 12 for $5 at Target.

And something for the teachers (I cleared these with my teacher sister):

We’re big Eos lip balm fans in our house. Plus they’re easy to find when blindly reaching into your purse. Or use any lip balm of your choice.

Just add hand soap or sanitizer.

Works with pretty much any Burt’s Bees product.

Just add nail polish.

Did you know you can gift Redbox gift codes via their website?

Always a crowd pleaser. Just make sure the card has enough on it for at least a grande drink.

a superhero girls’ fourth birthday

My kids are 3 months from turning 5, so now seems like a great time to blog about their fourth birthday party. I was kind of a mess last spring and not blogging much, but I don’t want to not document this on my blog. I enjoy planning my girls’ parties, and I know I can only enjoy this kind of thing for a few short years, so I want to make sure I document them so we can remember them in years to come. Last year, the girls were (and still are) super into superhero girls, and DC Superhero Girls hadn’t quite taken off yet, so I used the magic of the internet to help create a girly superhero theme that both girls and boys could enjoy. I love how adorable their superhero birthday party turned out.

Superhero Girls' Fourth Birthday Party Cake Table Setup

Washi tape plus science fair board = city skyline. (Idea here.) I downloaded the adorable clip art superhero girls from Etsy. I got the print-it-yourself invitations from the same seller.

Superhero Girls' Fourth Birthday Party Cape Favors

Every kid got their own cape when they arrived at the party. I got them via Amazon.

img_6558 img_6565 img_6569

Girls Superhero Fourth Birthday Party Activities

Activities included mask decorating, Hulk smashing, shield frisbee throwing, silly string “spidey” target practice, and bubble guns. I made the girls’ superhero dresses by sewing cute fabric onto tee shirts.

Food-wise, we served “hero” sandwiches, fruit and veggie trays with dip, and POP! corn. Claire especially loved the popcorn.

Girls Superhero Fourth Birthday Party POPcorn

Overall, it was a wonderful day, and I’m smiling looking back at these photos with people we love in our old house in Arkansas. Now I’ve got to get busy planning a rainbow-themed party for my almost five year olds!

Girls Superhero Birthday Party Girls Superhero Fourth Birthday Party Girls Superhero Fourth Birthday Party

I’m already obsessing about Advent

Ideas for creating a Jesse Tree Advent Calendar | erniebufflo.comI’m the first to gripe about “Christmas Creep” and how people keep trying to make Christmas happen before its time, which, in my opinion, should absolutely never be before the day after Thanksgiving. (Mostly because Thanksgiving is one of my favorites.) However, I spent the last week obsessively working on finishing the Advent calendar I started making for the girls in 2013. It was a bit more than I could achieve when the girls were one, but now that they’re three, not only do I have more time to craft, I really think they’ll enjoy incorporating this tradition and get something out of it. And I’m writing about it now because if you start soon, you’ve got time to make one before Advent starts, too. But not if you have two one-year-olds — take it from me and take it easy on yourself.

Celebrating Advent has always been part of my family and faith tradition, a way to focus on the “reason for the season” as my dad loves to say. Growing up we had an Advent wreath and candles, and I remember doing family devotionals sent home by our church. Through friends, I heard about the Jesse Tree tradition, which uses the whole “out of the stump of Jesse” prophecy from Isaiah to tell the story of Jesus’s family tree through ornaments and a tree. Each ornament corresponds to a Bible Story about one of the members of Jesus’ family tree, so each day leading up to Christmas, you take out an ornament and read the corresponding scripture. One friend even hosted a Jesse Tree ornament party a few years back, where everybody was assigned one ornament and made enough for everyone, so each guest left with a complete set but only had to make one type of ornament — fun and efficient!

Ideas for creating a Jesse Tree Advent Calendar | erniebufflo.com

Ideas for creating a Jesse Tree Advent Calendar | erniebufflo.com

Lots of people put the ornaments on their actual Christmas tree or on a smaller table-top tree that they use just for the Jesse Tree. I had seen many beautiful felt and fabric Advent calendars, so that’s what I had in mind. I love the idea of making a normal Advent calendar slightly more scriptural, so I started looking for Jesse Tree Advent calendars. I wanted to make something that my family could use for years to come and remember fondly, so I bought a kit from an Etsy seller that included patterns, instructions, and all the supplies. My kit was $60, but it looks like my seller is no longer selling the kits, just fully handmade calendars for $390. While I love my kit, I can’t imagine having paid nearly 400 bucks for a completed calendar, though I know that it’s worth that with all the painstaking work that goes into it. So painstaking, in fact, that I modified my calendar– I used puffy paint on the felt to make the ornaments instead of hand-sewing tiny layers and appliques, and I machine-sewed the body of the calendar. I have come to accept that I am just not a fan of embroidering. It’s beautiful, but tedious and frustrating.

Ideas for creating a Jesse Tree Advent Calendar | erniebufflo.com


Ideas for creating a Jesse Tree Advent Calendar | erniebufflo.com

Still, I didn’t want to write about finishing this beautiful thing for my family and then be like, sorry, folks, good luck to ya. I found a few felt Advent calendar patterns that I think you could fairly easily adapt into Jesse Trees by swapping out the ornaments, either by making these felt ornaments, by trying one of these other kits, or by buying a set of alreadymade Jesse Tree ornaments. There are also lots of free tutorials for making felt Jesse Tree ornaments online.

Is a Jesse tree part of your holiday tradition? Do you celebrate Advent in other ways?

finally finished: my blue willow inspired dining room

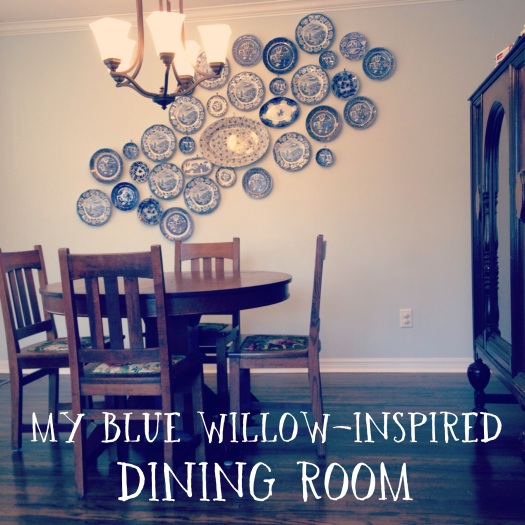
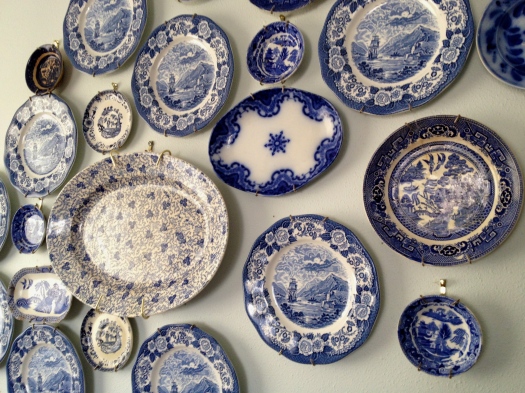
A few years ago, I inherited from my grandmother a collection of blue and white plates, some of which my grandfather had sent home from WWII to his mother. I have loved and treasured them in a cabinet for several years, but knew that the next time we owned a home, I wanted to decorate a room around displaying them. Well, we finally bought a house last summer, and all these months later, I’ve finally (mostly) finished our front/dining room.

IMG_0021

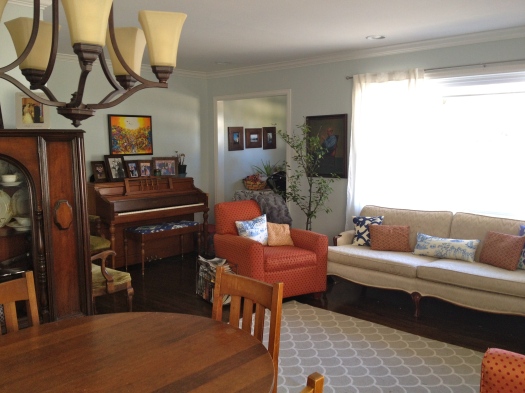
It’s a weird space, because it’s the first room you enter after walking in the front door, and there’s a strange freestanding closet that awkwardly sits in the middle of the room, I’m guessing because there used to be more walls that were removed, but the closet had to stay for structural reasons. I think the weird closet contributed to this house being on the market as long as it was, because it was hard to picture how furniture would go and how the room would be used. For us, it’s more of our formal living area, because there’s a big den in the back of the house where we have our giant sectional and TV and all of the girls’ toys.

IMG_0009

IMG_0008

IMG_0006

IMG_0005

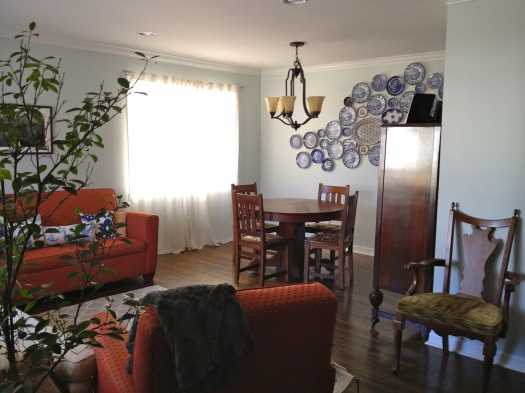
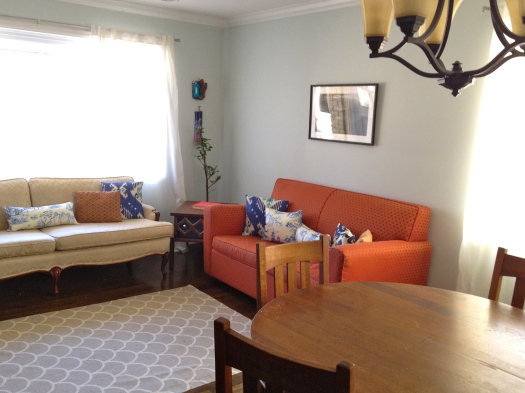
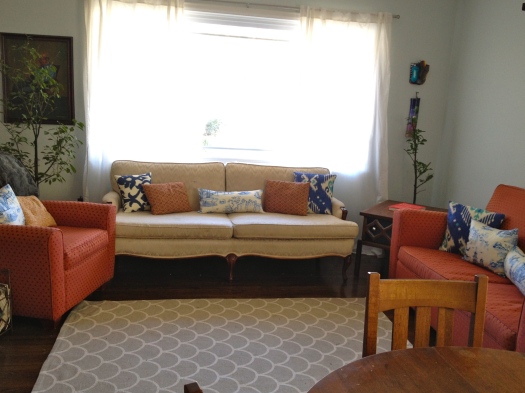
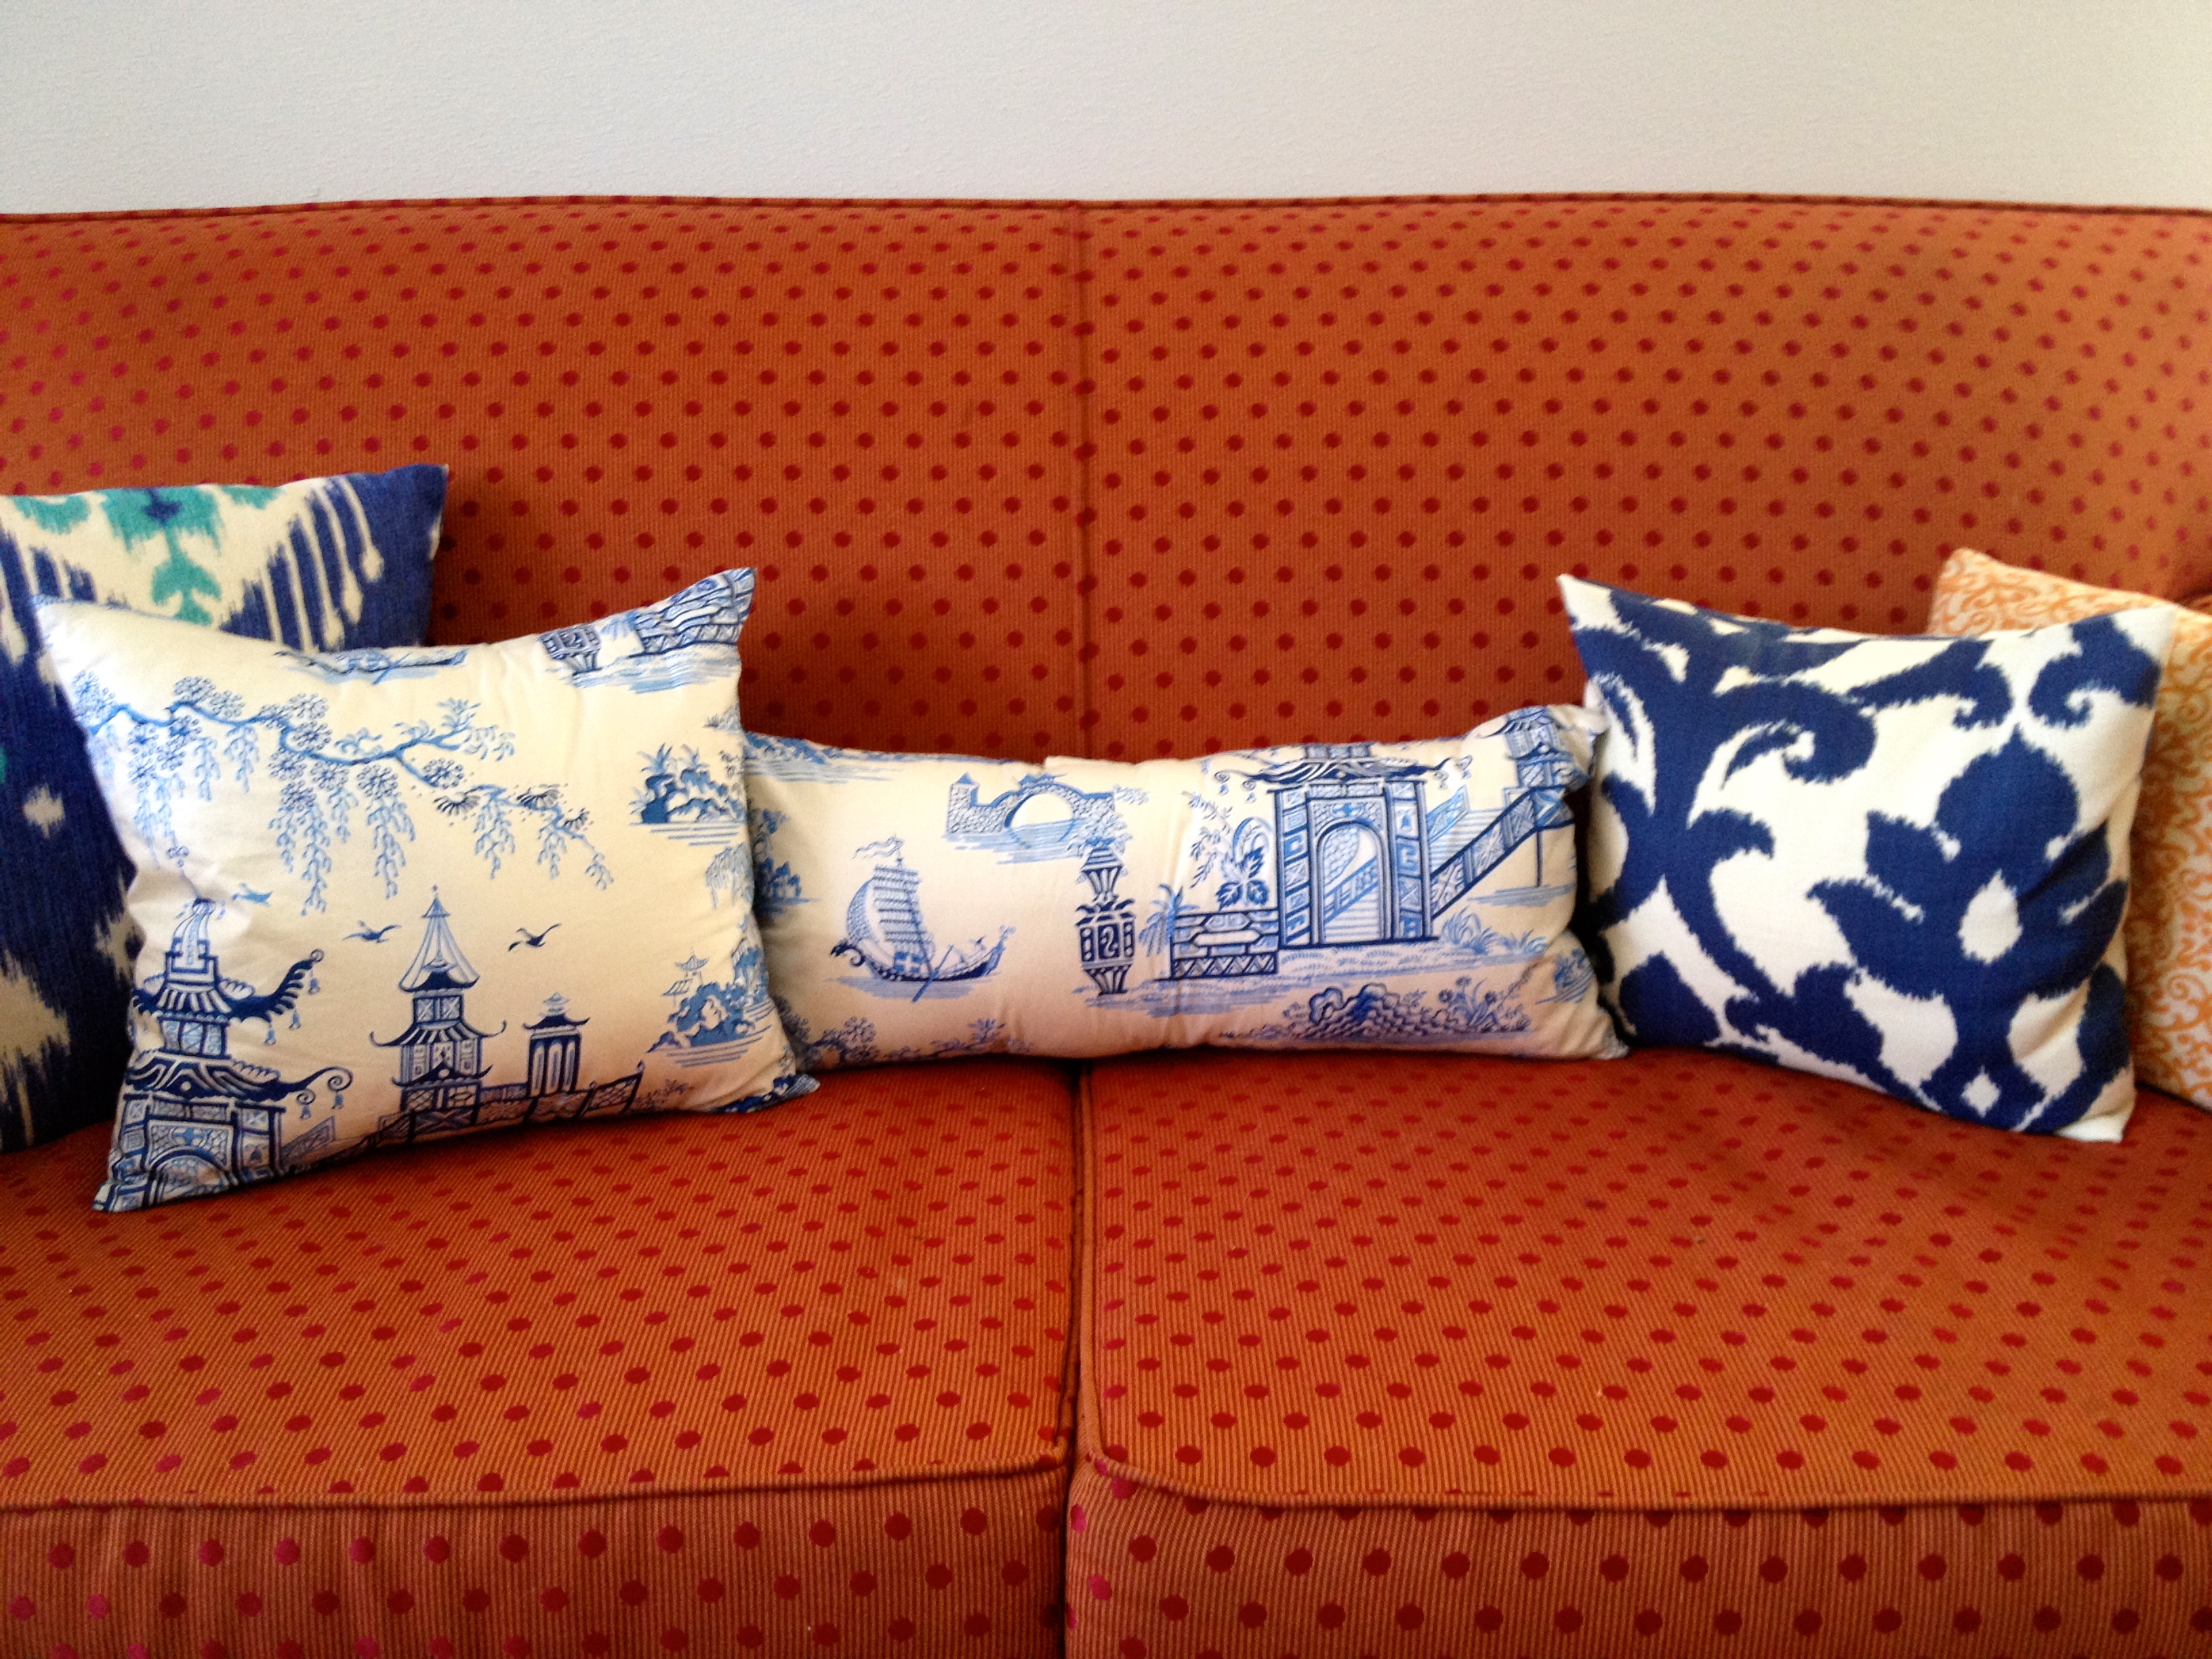
I made pillow covers (using this tutorial) in various blue and white prints to tie the plate wall into the sitting area, and I have plans to reupholster our couch and to recover the dining room chairs. I’m thinking solid colors for those, so let me know if you have ideas. The round table was a Christmas gift from my mother, who gave us her dining table after she heard me say I wanted a round table that expanded– this one has four leaves and can seat 12 with them all in place!

IMG_0014

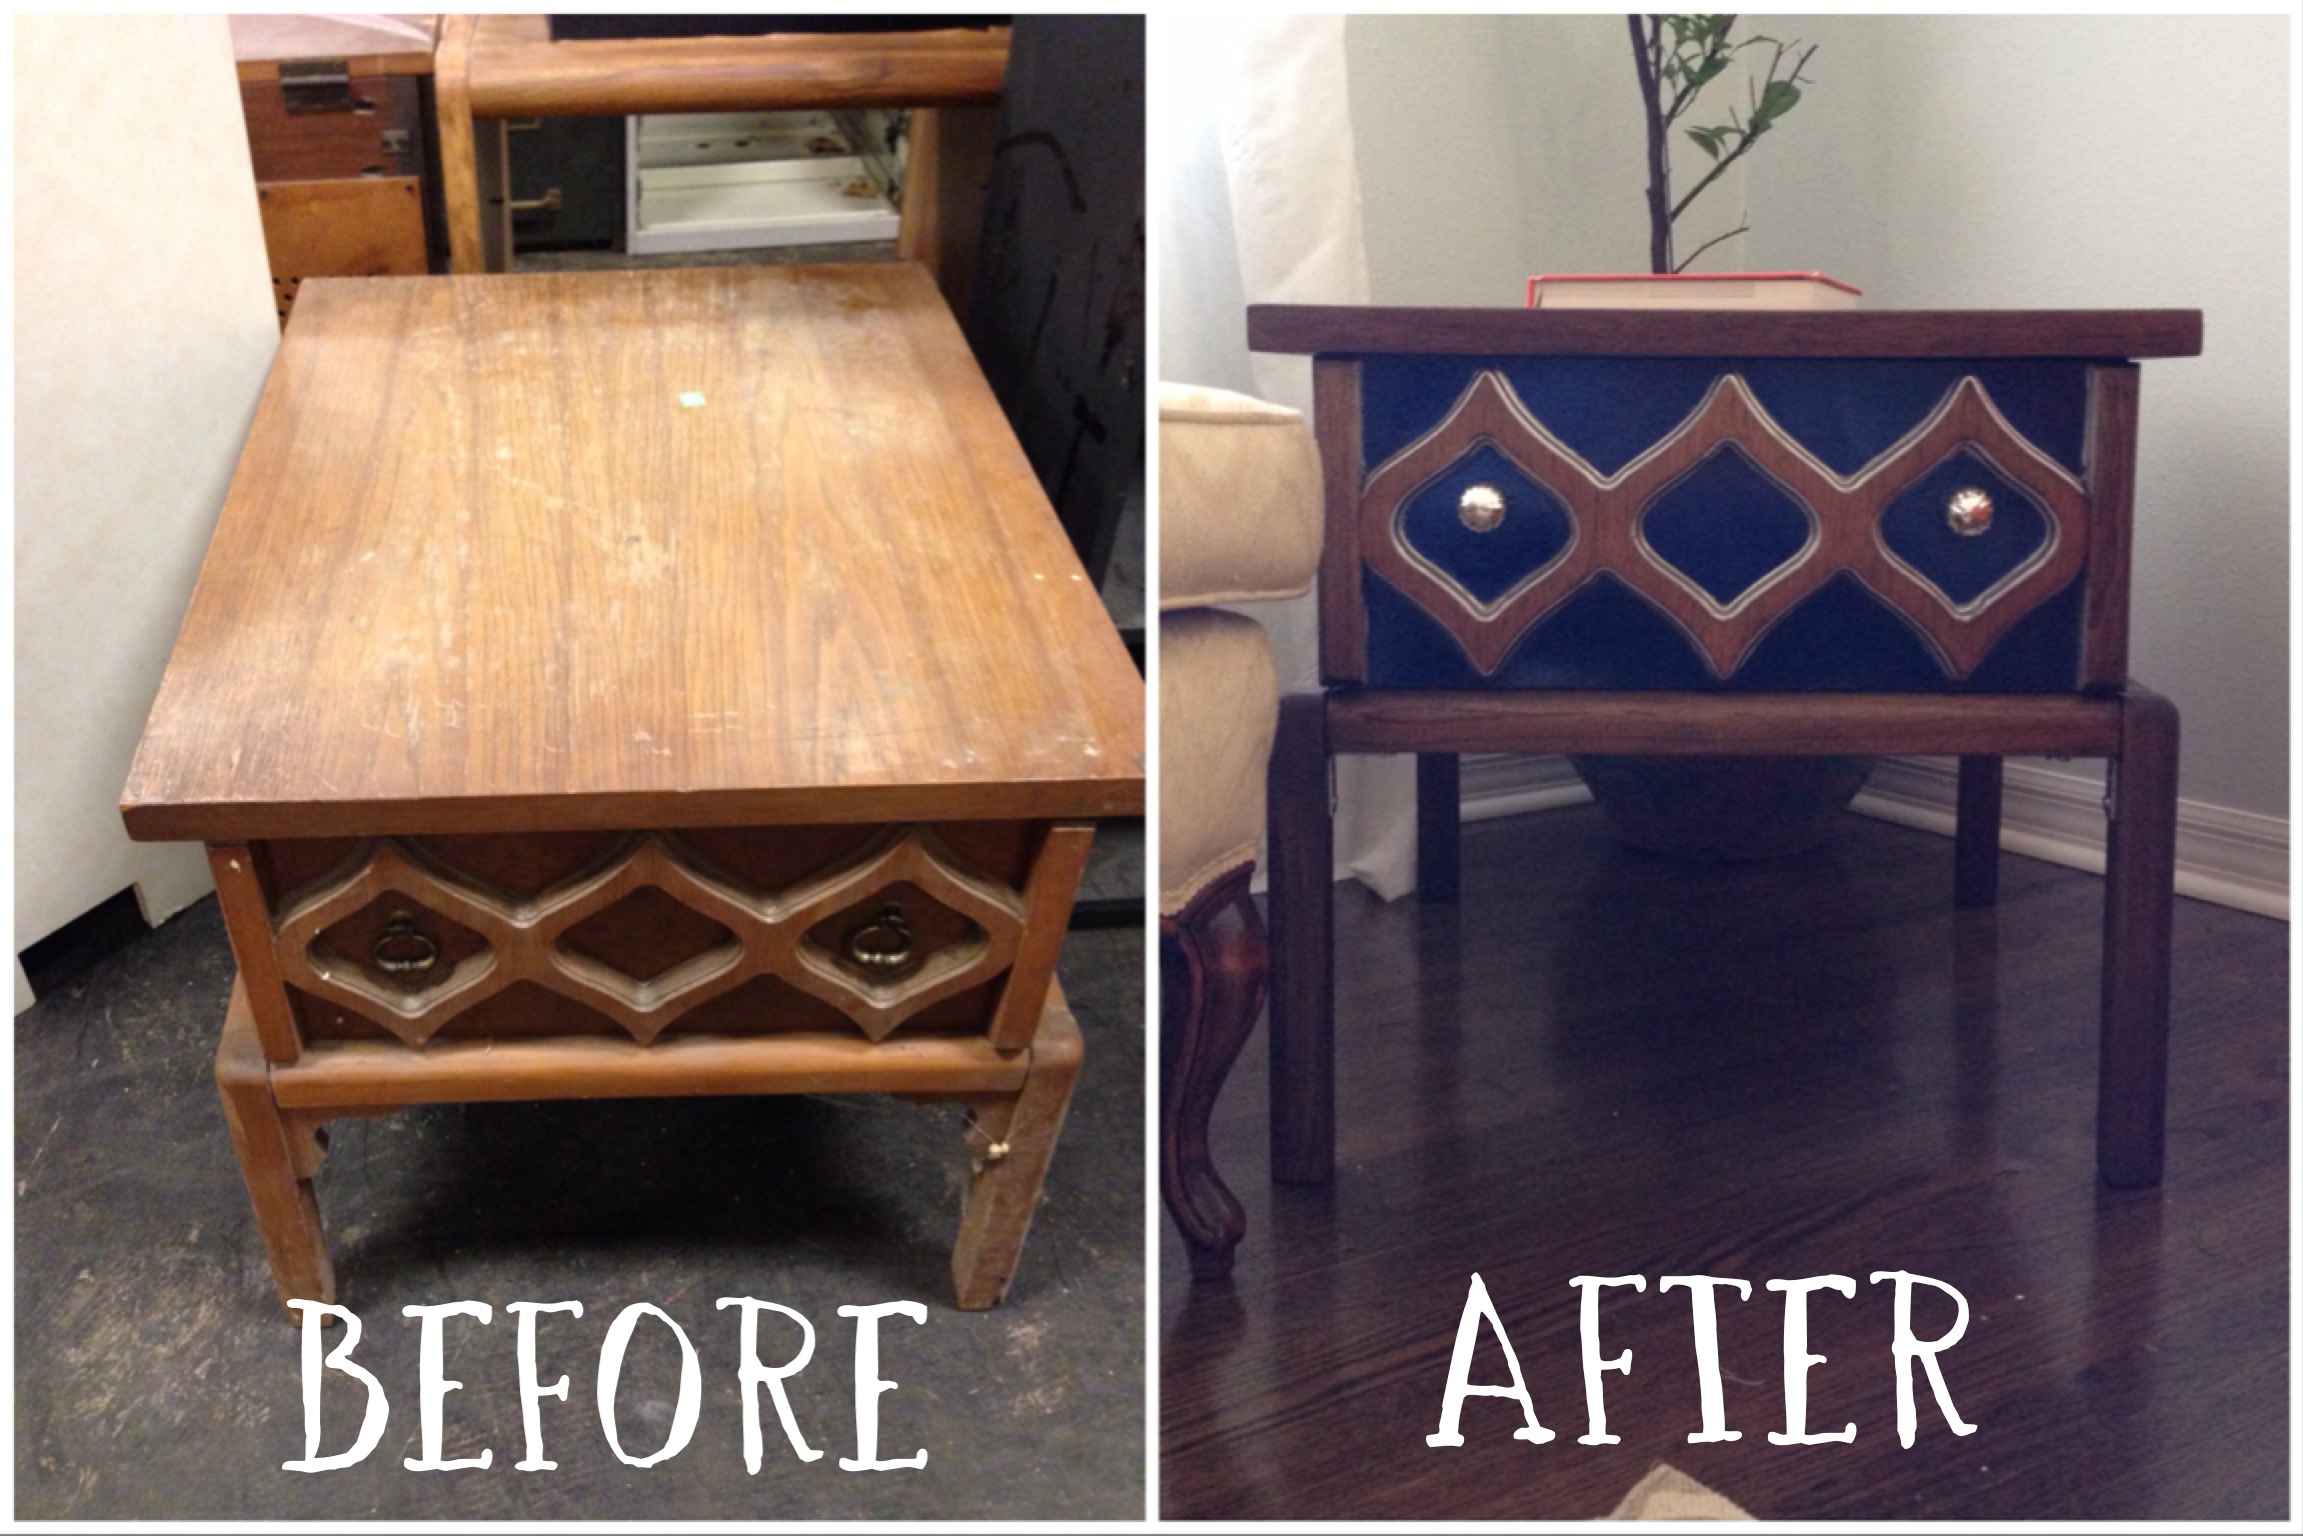
Another recent project, designed by me and executed entirely by my husband, was the remake of a thrift store end table.

IMG_0020

The real showstopper of the room, though, is the plate wall.

IMG_0016

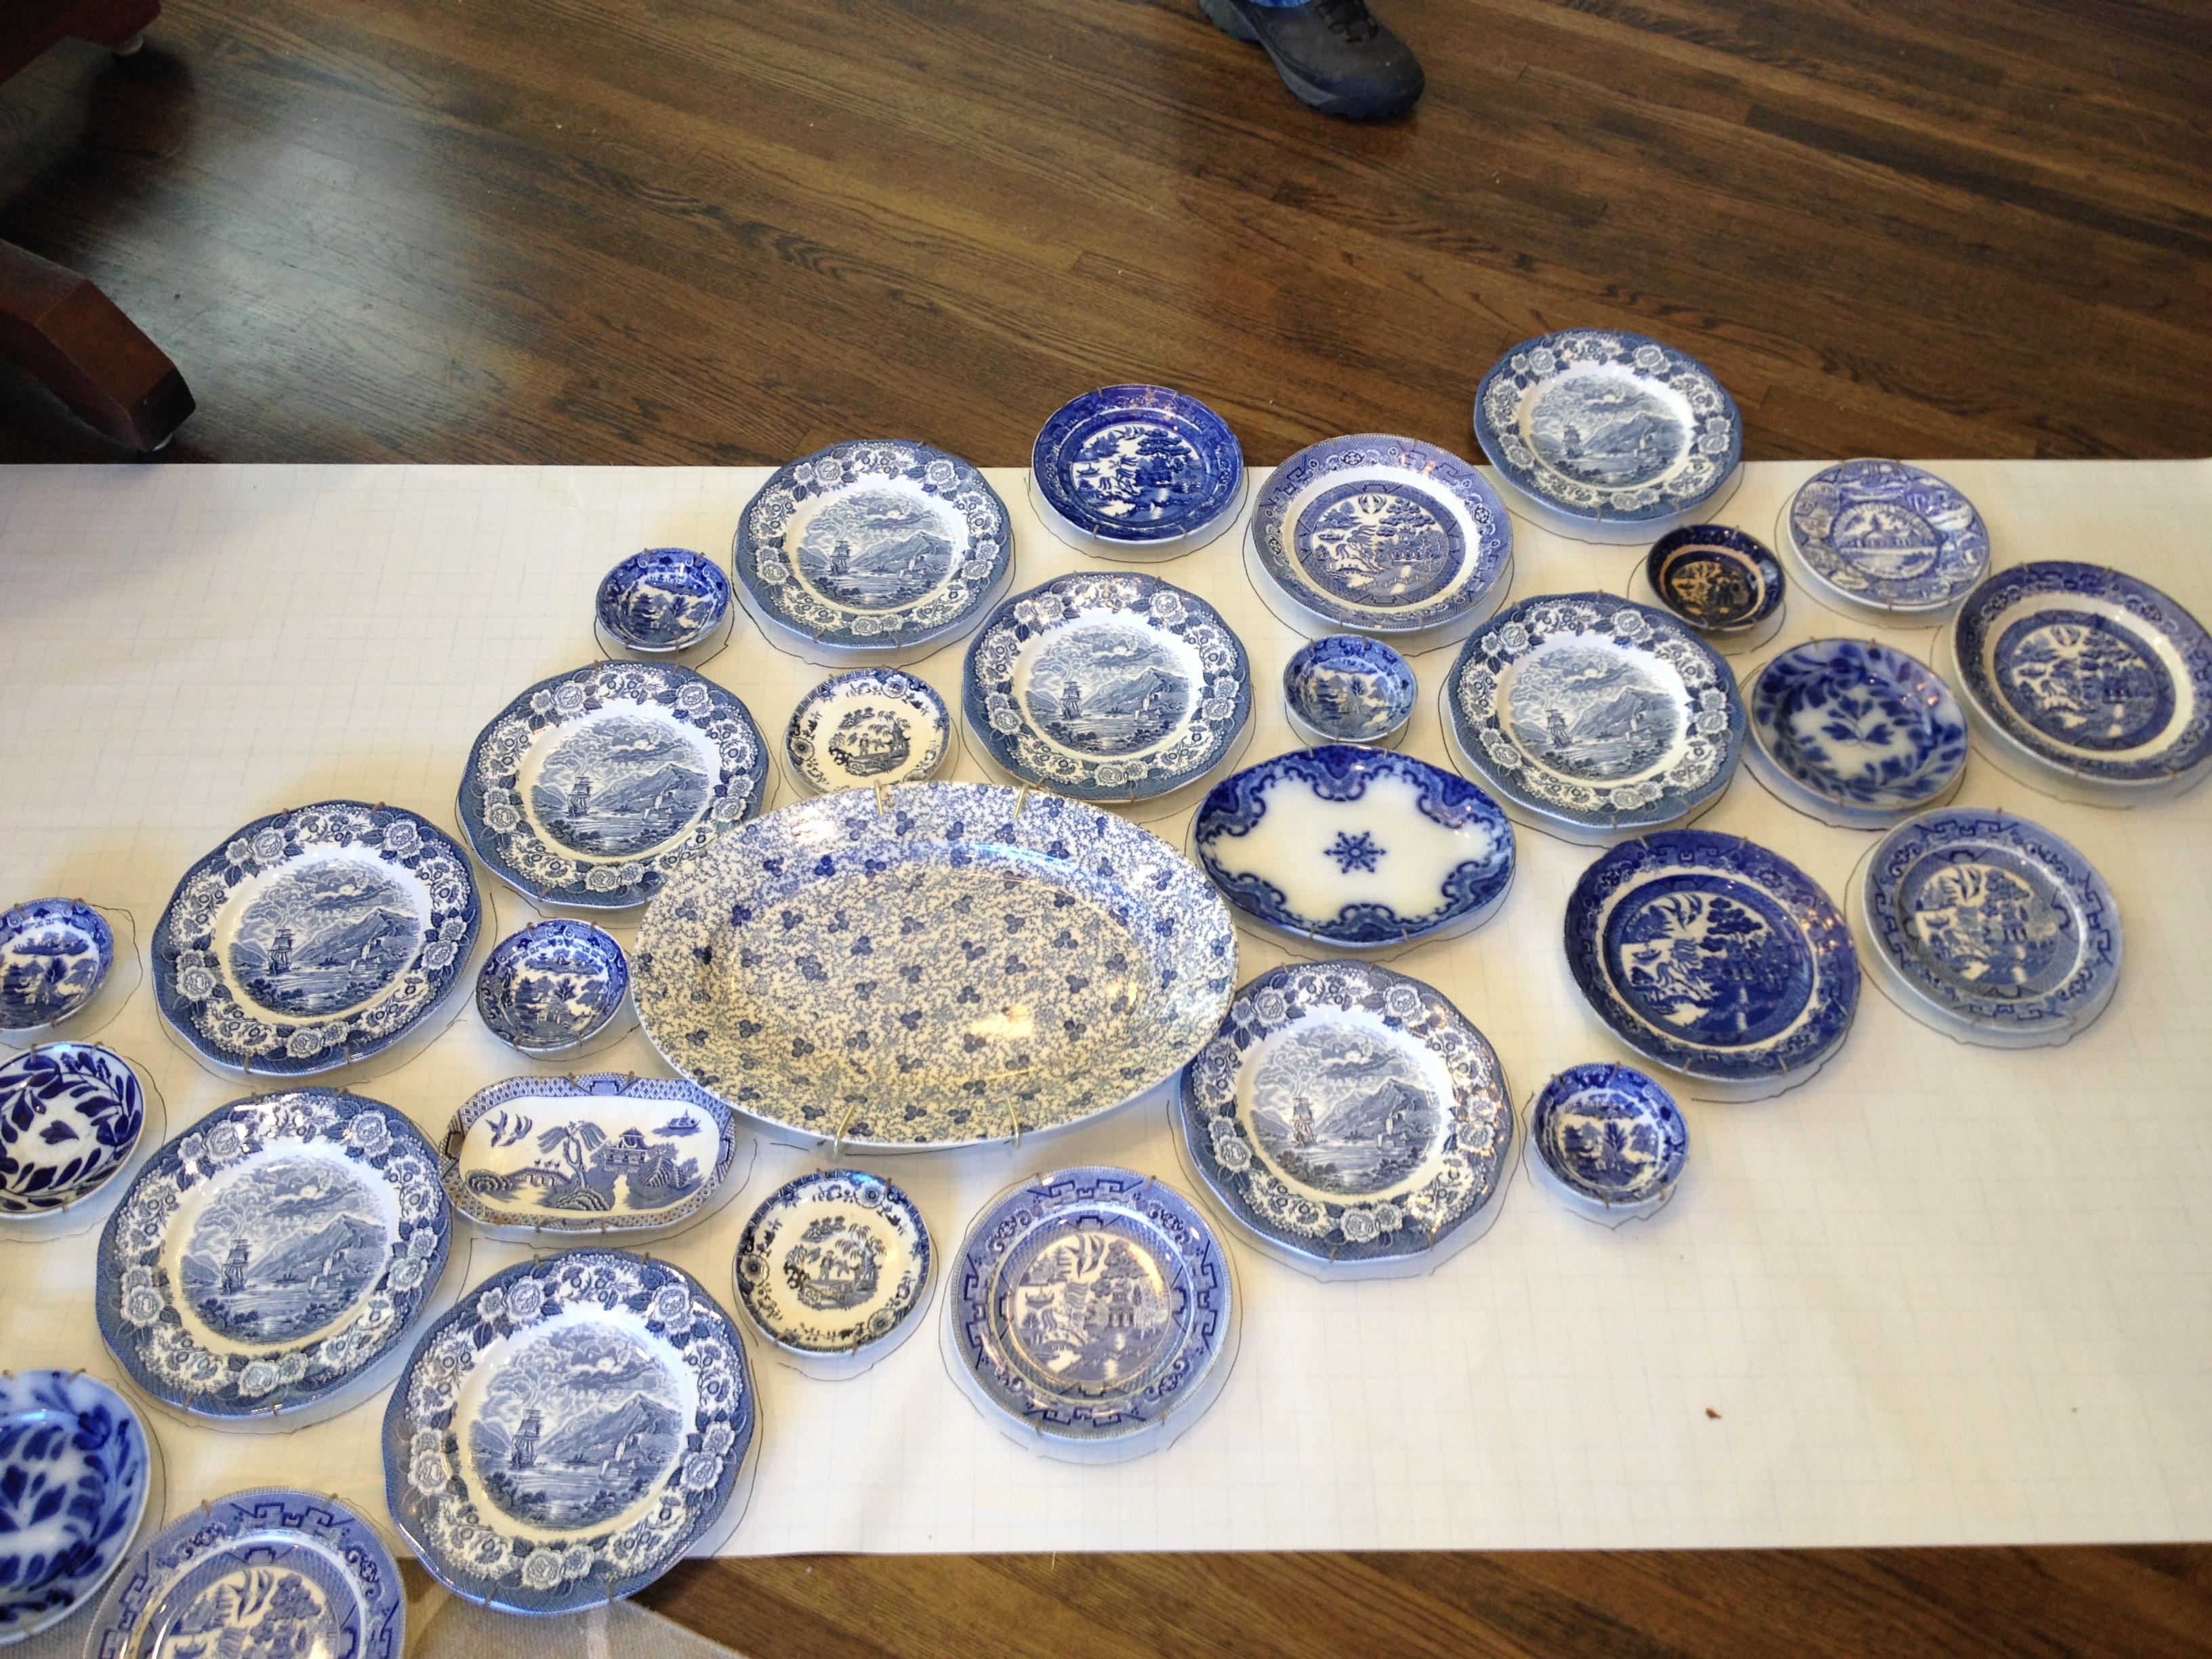
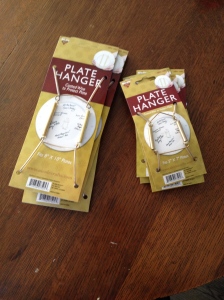
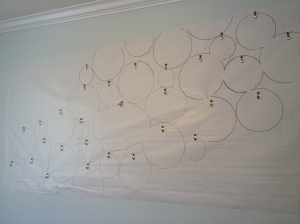
In case you’d like to do a plate wall yourself, here are my plate wall tips: After asking some friends who had hung some plates, I settled on the metal spring plate hangers. I rolled out some extra wide wrapping paper on the floor and laid out the plates on top of it. Then, my husband and I traced around the plates, photographed the arrangement, removed the plates, and hung the paper on the wall. From there, we nailed hooks into the paper, and then ripped it down, leaving the hooks behind. I then referred to my photos to hang the plates on the hooks.

IMG_0004

IMG_9980

IMG_9984

I love the way it turned out, and keep finding myself wandering into the dining room just to stare at the wall. It feels like something that belongs in the home of someone way cooler than we are.

Easy DIY: The InstaFridge

IMG_4836
Check out my fridge, covered in pictures of my babies! You, too, can achieve such a cool (ha) fridge!

Here’s the deal: there are companies that will make you magnets out of your Instagrams (and lets be real, the best pictures any of us are taking these days are on Instagram), but they charge $15 bucks for 9 magnets, and they aren’t very big. Meanwhile, I was recently informed by a friend that Walgreens has a cool new app that, among other things, connects directly to your Instagram and prints 4×4 prints at your nearest store for you to pick up in just an hour or two. For 39 cents a pop. So, using my rudimentary math skills (aka a calculator, because I am an English and Poli Sci major, and math makes me cry), that’s $1.27 cheaper than the pre-made magnets per picture. The savings shrinks a tiny bit when you take the added step of turning the prints into DIY magnets, but bear with me:

Supplies:

1 sheet foam board, or, if you’re extra thrifty, 1 cardboard box

A bunch of Instagram prints

Photo Corners (like these, which are less than $5 for 250)

Craft magnets (Amazon sells bazillions for like a nickel each) + glue gun if you don’t get the magnets with adhesive backing

Scissors

Steps:

  1. Affix pictures to cardboard or foam board using photo corners
  2. Cut out squares
  3. Glue and/or affix the magnets to the back of said squares
  4. Stick all over your fridge
  5. Laugh at schmucks paying $1.20 more per magnet for their StickyGrams that look tiny and puny next to your awesome creations

The bonus of using the photo corners as opposed to gluing the pictures directly to the foam/card board is that you can easily change out the pictures and reuse the magnets over and over again! Which will work great for me as my whole fridge is pictures of the Bufflo Gals, and they tend to do this pesky growing up thing, which means I need to update the pictures regularly.

%d bloggers like this: